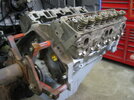
Back from paint

Discussion in '1973-1987' started by David Hall, Oct 21, 2008.

  1. David Hall

    David Hall Member

    Joined:
    Jun 3, 2008
    Messages:
    248
    Location:
    Chesterfield Va.
    No. not bored, just won't be satisfied unless I've been into it. Glad I did too, #2 crank and #3 rod journals are scrored pretty good. Now I'm trying to decide which way to go (have mine turned down or order up another crank). Paint color will be black.
    To stay with the semi factory look.
     
  2. David Hall

    David Hall Member

    Joined:
    Jun 3, 2008
    Messages:
    248
    Location:
    Chesterfield Va.
    Update on engine progress:
    At sometime during this engines life, someone has been inside it. It's been bored .030 over, the crank had been turned down .020 and the rods .010.
    I went round and round deciding whether to do a full rebuild on this 305. I finally decided to replace the worn essential parts and spend my money on parts that could be used again. Most of the parts I bought can be installed on any sbc. So I feel all was not wasted. After all its easier to sell a running engine than one laying in pieces. If I'm not satisfied I can pull my good parts and find a better bottom end.

    Engine hot tanked, new cam bearings and freeze plugs installed. Reman. crank and old pistons/ rods installed. The cylinder walls, pistons, rings and rods all looked good. Clearances on the mains were 0.0015 with the rods @ 0.0015 to 0.00175. That should give very good to excellent oil pressure. Thats as far as I was able to get last weekend.
    Most of the rest of the parts are in, but I'm working out of town so it will be a few days before I can get back to it
     
  3. Pontiac1976

    Pontiac1976 Member

    Joined:
    Aug 21, 2006
    Messages:
    482
    Location:
    Ontario, Canada
    Sounds good so far yes you should get really good oil pressure. To help in that area I would have cleaned the valleys debured the intake vallyes. Open up the holes a little proper size on all the returns holes to the oil pan.
     
  4. texascowboy

    texascowboy Member

    Joined:
    Oct 23, 2008
    Messages:
    180
    Location:
    Texas
    :D.......hey people what's ^^^

    hey david how ya been? good I hope. Well got my oil leak fixed, still working on the exhuast leak, can't figure that one out. I put two gaskets on it and that made it worse....:eek:....:mad:
    anyway I think I need to go back and replace my oil pump...going down the road it reads right around 45 to 50 and then when I stop at a red light it drops down too 20 or sometime less. And yes i check it normally{2-3 days}. Anyway just wanted to see how your truck was going??
     
  5. David Hall

    David Hall Member

    Joined:
    Jun 3, 2008
    Messages:
    248
    Location:
    Chesterfield Va.
    I guess I could have done that, but never had any trouble with my other rebuilds. You never know where all those metal chips or casting slags are going. For me it's hard enough getting it clean without creating more metal chips to worry about.

    Update on engine:
    Last night I installed the cam, double roller timing chain set, timing chain cover, oil pump and oil pan.
    It now looks like a short block.

    Isky 256/262 cam , set at 0 degree
    Cloyes double roller timing chain set
    Melling M55 oil pump w/ steel sleeve
    GM timing cover & oil pan
     
  6. David Hall

    David Hall Member

    Joined:
    Jun 3, 2008
    Messages:
    248
    Location:
    Chesterfield Va.
    What weight oil are you using? Are you getting this reading from factory or aftermarket gauges? Mechanical or electric gauges?

    Talking to the man behind the counter at the local speed shop, he said " most oil manufactures quit putting zinc in there oils, to break in the engine with a zinc additive." If I keep using conventional oils I would need the additive every oil change.
     
  7. texascowboy

    texascowboy Member

    Joined:
    Oct 23, 2008
    Messages:
    180
    Location:
    Texas
    :D...hey david how ya doing?? Sounds like everthing is going well with your truck, you 'bout ready to fire her up?? need some pics of evrything put together. How was your trip??

    anyway I'm using 10w/30 high mileage oil and my guages are aftermarket {sun dail} and it is ran on a mechanical guage. took the oil pan off yesterday and replaced the pump with a "massey high flow" some thing around 60+psi
    does that make sense?? been so busy all my projects are running together....:eek: don't know if its gonna help just yet haven't got a chance to drive it yet. still working on the header leak also.....:mad:
    talked to a guy at napa auto parts and he gave me some prematex #1 {brown}any way he told me to put it on both sides of gasket and it should stop the leak. you ever heard of this?

    well once again I jacked your thread...:(...:eek: sorry. btw... i did find a kink in my oil line also, so maybe the pump wasn't bad afterall..oh well too late.
    found the kink by the firewall, got it fixed, replaced the line.
     
    Last edited: Apr 20, 2009
  8. David Hall

    David Hall Member

    Joined:
    Jun 3, 2008
    Messages:
    248
    Location:
    Chesterfield Va.
    Texas, how's the new oil pump work. That kink in the oil line to the gauge would definitley hinder your readings.

    I know what you mean "about projects running together". I'm going through the same thing.
    I'm having to work weekends, hell I haven't had a day off since march. But the little 305 is coming along nicely.

    Latest engine progress:

    I sent the heads to the machine shop for a 3 angle valve job, Z28 springs and to pull the pressed in rocker studs out and machine them for screw in studs and guide plates. Got them back (awesome job) and installed. I finished them off with ARP studs and COMP cams guide plates. Installed the ISKY lifters and mounted two of the CRANE roller rockers on one cylinder to measure up the pushrod length. Mounted the OEM fuel pump and covered it up for the night.
     

    Attached Files:

    Last edited: Apr 26, 2009
  9. texascowboy

    texascowboy Member

    Joined:
    Oct 23, 2008
    Messages:
    180
    Location:
    Texas
    :D...David that little 305 is gonna be a monster, that thing looks great.
    What color is that?? looks like an off sliver? but, that might be me, I'm a
    little color blind anyway and the whiskey doen't help either...:eek: :)
    Anyway the motor looks good, whish I could hear it run when you get it going.
    Anyway got the oil pump change out and the pressure seems to be back to normal...sitting at stop...25-40 and going down the road...45-60, so I hope it works out good. Also got my header leak fixed...found some premetex #1 and put it on both sides of the gasket and right now it seems to be working.
    still might have to come up with a different bracket to hold the power steering pump. I'll keep you posted. :)

    anyway hollar at you later....Btw check out my new post ????
    might need some input. Thanks ...TC
     
  10. David Hall

    David Hall Member

    Joined:
    Jun 3, 2008
    Messages:
    248
    Location:
    Chesterfield Va.
    Lol

    Sorry but I had to laugh, that color is etching primer. I didn't get to take any painted pictures of the block... must have been those Bud Lights
     
  11. Pontiac1976

    Pontiac1976 Member

    Joined:
    Aug 21, 2006
    Messages:
    482
    Location:
    Ontario, Canada
    Sound good so far for the little 305, you got a little bit more cam then I do I have pretty much same Melling M55 oil pump w/ steel sleeve Cloyes double roller timing chain set GM timing cover & oil pan GM 305 heads clean opened all the oil returns slight open of all the ports clean smooth them out. Same done to the block, I running small car 305 ex manifolds to 2-1/2 single pipe right now but will be duel. Kool keep posting. Texascowboy good to hear that your ex leak is fixed so far.
     
  12. texascowboy

    texascowboy Member

    Joined:
    Oct 23, 2008
    Messages:
    180
    Location:
    Texas
    Told ya I was color blind!!!!:eek: I talked to the guuy who I got the motor from and he told me that even when he had the motor in his 74 he had troble with the exhaust leak also, told me I might have to replace the header due to it might be warped due to the fact of the power steering bracket.
    Sounds like both of you guys little 305's are gonna rock. Yeah I gotta lay of the whiskey for awhile too many headaces.....:p
    pontiac1976 your motor sounds like a good one too, yeah got the leak fixed now just gotta work on other small problems.
     
  13. Flamingbig10

    Flamingbig10 Member

    Joined:
    Apr 27, 2009
    Messages:
    14
    nice truck, looks good so far
     
  14. David Hall

    David Hall Member

    Joined:
    Jun 3, 2008
    Messages:
    248
    Location:
    Chesterfield Va.
    Update on engine,

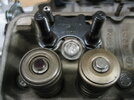
    The main reason roller rockers make horsepower over stamped rockers is less friction. To make them work to the utmost you need a few tools and be able to do some extra work. The roller at the rocker tip must contact the valve stem slightly inboard (intake side of the stem) when the valve is closed. Roll out (middle of the stem at half lift) and end up slightly outboard (exhaust side of the stem) when the valve is fully open.

    Then if all that wasn't enough, the roller tip (when viewed from the side of the engine looking toward the intake) has to be centered on the valve stem. This is adjusted with the pushrod guide plates. Remember less friction equals horsepower.

    With help from the machinist at work we made, a solid hydraulic lifter, and a adjustable pushrod out of a stock 5/16" pushrod. Why buy any tool when it can be made. The solid lifter is used because a hydraulic lifter will colapse when rotating the engine to get your mark on the valve stem top.

    I marked the #1 intake valve stem top with a sharpie pen. After installing the solid lifter ,adj. pushrod and roller rocker on the #1 intake valve, I rotated the engine 2 complete revolutions. Stopping at TDC on the #1 cylinder I removed the rocker and observed that my stock length pushrod was too long. After doing this at 0.050 increments (on different cylinders and both banks),I found that my pushrod length needs to be 0.200 shorter than stock. Total pusrod length shortened (0.175) plus (0.025 preload or lifter spring compression). When you find your length don't forget to add your preload length to it, for your total new pushrod length.

    General speaking if the mark on the valve tip is outboard (exhaust manifold side of the head), the pushrod is too long. And if the mark is inboard (intake manifold side of the head), the pushrod is too short.

    I ordered up a set of Comp Cam 7.500 magnum pushrods and will post my work when I get them installed.
     

    Attached Files:

    Last edited: May 4, 2009
  15. texascowboy

    texascowboy Member

    Joined:
    Oct 23, 2008
    Messages:
    180
    Location:
    Texas
    :cool:..., sounds like you got everything going pretty smooth. Still really don't know alot of what you are speaking of....:confused:
    But the more I look at your post the more I understand the concept.....:)
    anyway keep up the good work, let us know how it s going. :D
     
  16. David Hall

    David Hall Member

    Joined:
    Jun 3, 2008
    Messages:
    248
    Location:
    Chesterfield Va.
    Engine pictures taken over the weekend.

    Block painted semi gloss black.
    Edelbrock aluminum water pump installed.
    Two groove crank pulley installed.
    Moroso valve covers just resting on the heads to keep out dust/ debris.
     

    Attached Files:

  17. cowboy357

    cowboy357 Member

    Joined:
    Oct 14, 2008
    Messages:
    229
    Location:
    Kansas
    It Sure looks like Your doing it Right David , I,ve been Following the thread , Interesting read & Great step by step Pic,s , Thanks for taking the Time & Looking forward to More . Great looking truck BTW . :D Bob
     
  18. David Hall

    David Hall Member

    Joined:
    Jun 3, 2008
    Messages:
    248
    Location:
    Chesterfield Va.
    Thanks CB,

    Always wanted to do one but never had the time or money. I know I have more $$ in this truck than it will ever be worth but thats not the point. The point is knowing I can finish it, have something the working man can afford and enjoy it. I've messed up alot and learned more. There comes a time when pictures help more than words. Hopefully the pics are helping others.

    dh
     
  19. texascowboy

    texascowboy Member

    Joined:
    Oct 23, 2008
    Messages:
    180
    Location:
    Texas
    :D....motor looks great "dh" I like that color scheme....:cool:

    just out of curioustiy, are you gonna put any chrome on it or stay with
    the colors you have? anyway I like what you've done so far ....keep up the good work. And yeah pics do help alot ....to me anyway. I ve always been the kind of hands on type person....easier to learn things that way. The first motor I ever did I had so many things wrong that it took me forever to get that thing running...now I am no professional mech. but I know enuff to get by and yet I'm still learning everyday.
     
  20. David Hall

    David Hall Member

    Joined:
    Jun 3, 2008
    Messages:
    248
    Location:
    Chesterfield Va.
    For some reason I don't feel chrome, never have much.

    Na, this one will be black and aluminum. Should really set off the engine bay.
     

Share This Page