• We have upgraded our forum software! See here for details.

Lakeroadsters' Build Thread: '65 SWB Step

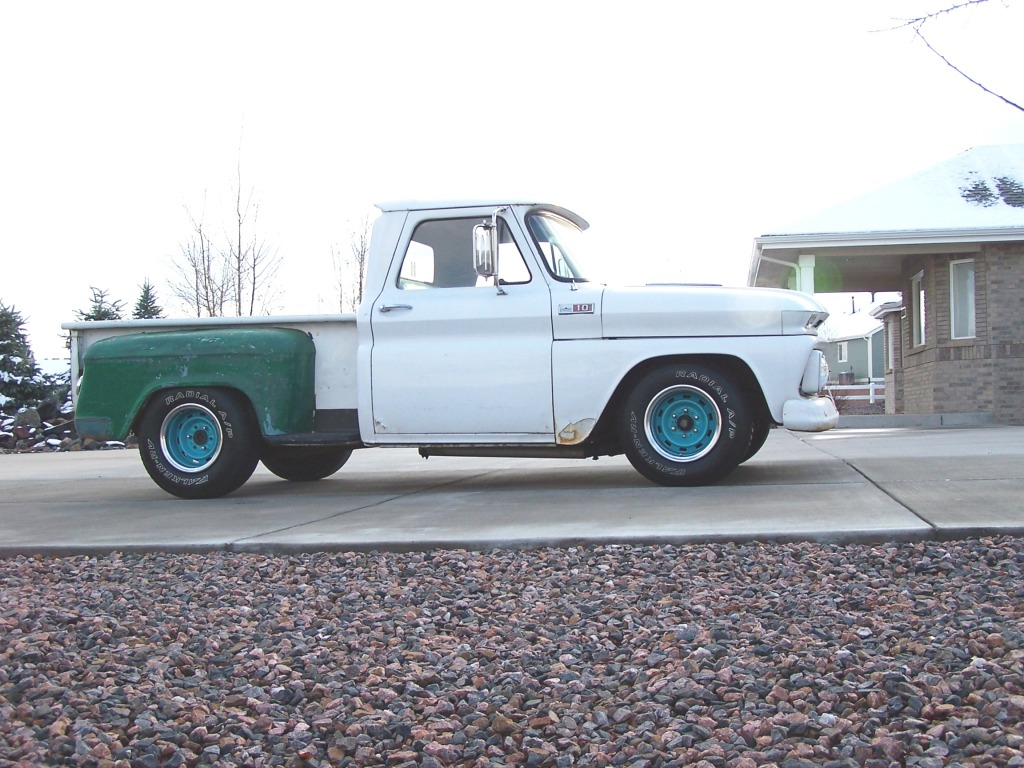
07-12-2011: Fauxtina Paint, Post #7

Color sanded the left rear corner of the bed. Goes from hideous to fauxtina with some elbow grease and 320 grit. :D

2011_07120013.jpg


2011_07120018.jpg
 
Last edited:
Hey buddy....

I've missed ya' man!

I registered just to keep up w/your build (I lost your e-mail address) :D . I'm diggin' the progress & the faux-tina is looking quite nice. What does the wife think now? Does she still want the ruddy-brown primer color?
 
If It's Brown Flush It Down..

Thanks Scoti, right back at ya! Good to have ya on the site here.

The wife likes the orange... kind of funny, she says "orange" is my color, and here I always thought grinding filth and rust was my color :D

Sadly progress has been slow on the truck. I landed a new job which has me working a lot of hours and it's been hotter than the hinges of hell here in Colorado for the past month.
 
Last edited:
Thanks Scoti, right back at ya! Good to have ya on the site here.

The wife likes the orange... kind of funny, she says "orange" is my color, and here I always thought grinding filth and rust was my color :D

Sadly progress has been slow on the truck. I landed a new job which has me working a lot of hours and it's been hotter than the hinges of hell here in Colorado for the past month.
Finally found you! Looking forward to seeing the truck finished!!! p.s. I see you went with orange. ;)
 
09-02-2011: Fauxtina Paint, Post #9

Did a bit more work on the stepside bed. The bed had shiney spots from the areas that were low and didn't get sanded. I used my hand finishing sander with a green Scotchbrite attached. This helped but there was still some gloss. I then used some full strength degreaser (Purple Power) and simply wiped it on with a shop rage, then removed it with a dry shop rag. That did the trick.

2011_09020014.jpg


2011_09020013.jpg

These photos show the "gloss" difference between the fresh untouched paint on the fenders versus the sanded and deglossed bed:
2011_09020020.jpg


2011_09020018.jpg
 
Last edited:
Finally was able to get in a little shop time. I want to get some color on the back of the cab and then get the bed back on before winter. Removed the custom cab panels, taped the two-tone break line and rolled on the first coat of primer.
2011_10160030-1.jpg

Also removed the stock (boring IMO) '65 C10 emblems, replacing them with used '62 C-10 emblems I purchased from Jonscustomshop .... I really like the classic "old school script" look of the '62's. Jon has a ton of trucks of this era, he is an excellent source for GM used parts.

Stock
100_6796.jpg

1962
2011_10160023.jpg


2011_10160022.jpg


Last edited:
10-23-2011: Fauxtina Paint Post #11

Painted the back of the cab... pretty stoked to see some color and to get a visual on the orange and white with the factory two tone break line.

2011_10230026.jpg


2011_10230025.jpg


2011_10230029.jpg


2011_10230032.jpg
 
Last edited:
Your process of aging patina looks great...Nice to show us how you have done your work..pics too!
Do you plan to clear coat the finished product?
Bob
 
Thanks, 4JSAToo. To answer your question no I am not planning on clearcoat.

Here in the arid high plains of Colorado it is pretty dry and the sun is very intense. Clearcoat tends to not hold up very well out here. Seems there are a lot of cars that have the clearcoat coming off. Looks pretty hideous.

On my shop door I have to clearcoat it every other year, my sacrifice to the sun gods I guess.

Since I am going for a weathered look as the paint ages it will do so with character that makes it even more unique, at least that is the plan :D.
 
Halloween 2011: Fauxtina Paint Post #12

Did the patina process of sanding, scotchbriting and chemical deglossing on the back of the cab today. Then re-assembled the cab vents and cb antenna. Reinstalled the bed and removed the front bumper. I needed it off for painting the front of the truck and I am going to fabricate a pipe bumper, a "gasser" style influence. Did a mock up using some drainage pipe. See last picture below for another truck with the look I am after

2654971290103882008vCPylE_fs.jpg


2524707570103882008bLhOgU_fs.jpg


2878906570103882008IZVSor_fs.jpg


2702799340103882008cpIYdy_fs.jpg


The Inspiration For The Pipe Front Bumper.....
Inspiration-1.jpg
 
Last edited:
And a lift in your garage too...now I'm jealous. Gasser influence..I guess you"ll be adding injector stacks and maybe a beer canister gas tank!
I like what your doing and interested in seeing your pipe front bumper.
Neat project..
Bob
 
And a lift in your garage too...now I'm jealous. Gasser influence..I guess you"ll be adding injector stacks and maybe a beer canister gas tank!
I like what your doing and interested in seeing your pipe front bumper.
Neat project..
Bob

Thanks Bob. In regards to my gasser comment I guess I should have stated "gasser era"... Think push truck front bumper. I have been drawing some sketches of concepts for the front bumper. We'll see how things progress.​

great to see this again!

Hey Jon, great to see you posting on this site! You got any upclose photos of the stainless trim the GMC's used on the back of the cab? I am wondering what I want to do where the orange paint meets the white on the back of my cab. I want to got with either some 'bright" trim or a heavy pinstripe, maybe black.​
 
Last edited:
Never been one for the patina look, but, your truck looks great and I am seeing many things I want to incorporate into my build.

Thanks for all your time and dedication!
 
http: //www.persh.org/Pickup/DomeLight. htm

hey check out this cool tech on how to do a dome light, this seemed like something you would probably do!

(to get that link to work you will have to remove the spaces between, : and //, and, . and h
jon
 
Last edited:
Back
Top