Major Cab Repair

Discussion in '1960-1966' started by 65Custom, Nov 19, 2008.

  1. bonvo

    bonvo Member

    Joined:
    Mar 6, 2007
    Messages:
    122
    Location:
    vacaville california
    :eek::eek: damn that rot is bad mines a 56 and the floors are solid the only rust i have really is suface except for the cab corners good luck man i hop the floor swap works
     
  2. 65Custom

    65Custom Member

    Joined:
    Jun 4, 2007
    Messages:
    50
    Location:
    Canton, Ga
    Progress Update

    Got the donor floor back from the blaster and coated with some metal prep to keeper from rusting again and I have gotten started on the replacement of the rot, repair work got stopped due to work, I have to make a living to be able to do this anyway just an update to show progress and what is going on in case anyone else has questions So I have attached pictures hopefully this week I can get back to it and get to burn some wire.
     

    Attached Files:

  3. Arlo

    Arlo Member

    Joined:
    Jul 29, 2008
    Messages:
    64
    Location:
    Tomball, Texas
    man i just cant wait to get to start on my body work.... Just finished chassis going to start bed this evening i will have to get the camera out.
     
  4. 65Custom

    65Custom Member

    Joined:
    Jun 4, 2007
    Messages:
    50
    Location:
    Canton, Ga
    Making progress, but slowly.

    Earlier this year I was a little down and then the weather was a little on the cold side for working in the garage with out any heat, any I did managed to make some progress.

    I have most of the rust patched and most of the holes filled in on the firewall so Im getting close to finishing up on the floor and starting on the cab getting it ready for the transplant
     

    Attached Files:

  5. Big Richard

    Big Richard Member

    Joined:
    Jun 4, 2009
    Messages:
    7
    I thought I had problems. I too had to replace the inner and outer rockers on both sides and the floor pans. I also had to refabricate the lower door posts on both sides. The patch panels you got are going to need some fine tuning. I ended up cutting my floorboard back to good metal and used it as a template over the pacth to ge my dimensions. As I said, I had to do some fine tuning to figure out the missing areas. Good Luck with your build.
     
  6. 65Custom

    65Custom Member

    Joined:
    Jun 4, 2007
    Messages:
    50
    Location:
    Canton, Ga
    Major Cab Repair Update

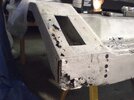
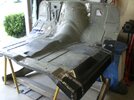
    Just thought that I would put out another update. I finally got the floor finished, so that I can start on the cab posts starting to get excited about getting the floor in the cab but the weather is getting hot here and working in the garage with the door down as so not to bother the neighbors is a pain in the you know what but that is another long story.

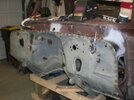
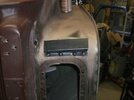
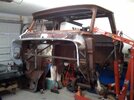
    I got the passenger side B post cut and fitted in place, so it is ready to be welded in hopefully if work does not get in the way I can get it welded in tomorrow. here is a couple of pics of the progress.

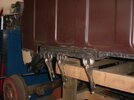
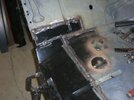
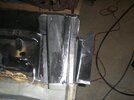
    Also added some pics of the rear floor braces, I had to make them by hand because the parts that you buy do not have the correct angle at the outside of the floor and metal thickness for the rear braces was too thin the originals are 14 ga material and the replacements are 18 ga
     

    Attached Files:

  7. 65Custom

    65Custom Member

    Joined:
    Jun 4, 2007
    Messages:
    50
    Location:
    Canton, Ga
    Major Cab Repair Update 06/30/09

    yesterday I got the A & B post welded in place and have the rear floor unbolted and Spot welds on the back panel cut, so the back of the cab is ready to be popped loose. I will be working on the front fire wall and removing the bracing after hanging it on a special hanger that I built to hang the cab while, I fix the front firewall mounting flange as it is well rusted.
    I guess this thread is sorta turning into a build thread or at least a build for the cab. believe me if I had know how bad this was before I spent so much money on it I think I would have gotten another cab and been much further along. The good thing is I'm still working on it so I see progress, the bad side is that if I had a good cab I think I would be stopped due to the money thing that everyone is going through including me.

    Will update later when I get the floor out.

    Later
     

    Attached Files:

  8. 65Custom

    65Custom Member

    Joined:
    Jun 4, 2007
    Messages:
    50
    Location:
    Canton, Ga
    Alright making some major progress. I have gotten the new floor under the cab and now working on getting it squared up, bolted and welded in place. Progress is slow since I only get a couple of hours in the evening for working on it and then it has been rather hot here the last few days which makes it even harder to make progress. so things are coming together just slowly more slowly that I would like but I also want to make sure that it is done right and not hacked together

    Later
     

    Attached Files:

  9. 66 KUSTOM

    66 KUSTOM Member

    Joined:
    Jan 11, 2005
    Messages:
    624
    Location:
    SALEM OR
    looking real good, if you were looking to lower your truck to the ground this would have been a great time to do a body drop.
     
  10. 65Custom

    65Custom Member

    Joined:
    Jun 4, 2007
    Messages:
    50
    Location:
    Canton, Ga
    I am going to lower the truck. I have air bags for it, but I'm not dropping it to the ground. I prefer a not to modify the truck that much at least not this one maybe the next one.
     
  11. 66 KUSTOM

    66 KUSTOM Member

    Joined:
    Jan 11, 2005
    Messages:
    624
    Location:
    SALEM OR
    im not interested in lowering mine quite that low either, but i have done a few, lots of work involved.
     
  12. wild bill

    wild bill Member

    Joined:
    Aug 20, 2009
    Messages:
    4
    Location:
    iowa
    rust worms

    greeting's new member hear i just had to chime in and comizerate .yeah i have been the same route with my 61 gmc 4x4 it isent done yet and might not be .i just stabilized the cab on the frame as best i could and burned up almost a full 4x10 sheet of 16 gauge steel making the panels .i got new oem outer rocker panels and made the rest ,sorry about the pictures .i am trying to figure out how to down load them .they are on picassa web albums they are scaned pictures .:confused:
     
  13. wild bill

    wild bill Member

    Joined:
    Aug 20, 2009
    Messages:
    4
    Location:
    iowa
    pictures

    i think i have some now
     

    Attached Files:

  14. 65Custom

    65Custom Member

    Joined:
    Jun 4, 2007
    Messages:
    50
    Location:
    Canton, Ga
    In the same boat

    Yep I think we are in the same boat, I have made a lot of progress as I have the floor back in the cab it went really smooth a lot smother than I thought that it would go. I also had to replace the entire lip around the front cowl and to do that I had to removed the air boxes those are clean now and going back on this week also the back wall will be welded back in this week as well as patches for the cab corners and the back lip a good section is needed to be replaced as well so lots of work I want to wrap up the cab soon so that I can start on the rest of the truck Ill post some more pics soon. Work is getting in the way of progress on my truck but it does pay for the truck.
     
  15. 65Custom

    65Custom Member

    Joined:
    Jun 4, 2007
    Messages:
    50
    Location:
    Canton, Ga
    Floor Replacement Update

    The floor is in and all is looking good. It went better than I thought it would. Everything is coming together well. I have started fitting the rockers and the cab corners. So putting the doors on and checking the gaps fitting everything. so far the gaps are better than they were when I got it and tight so I think this was the right decision to replace the floor after all.

    I suggest anyone who may need or want to do this type of replacement the best advice I can give you is take your time don't rush it and think about what you are doing and about how things go together, Take plenty of pictures so you can tell where all the welds were and where you need top weld it back together.
     

    Attached Files:

Share This Page