To be continued... 
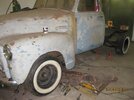
Since my parts, to assemble the rear suspension, didn´t show up on Friday, i decided, to produce a new rust/dust cloud in my workshop 
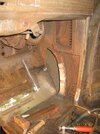
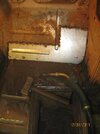
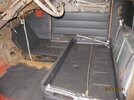
Once again, i took out my favorite tool, the wire brush and angle grinder, and went over the cab floor. Good thing, the middle section, in between the bench support panel is basically sound, with only a few tiny thin spots, which can be Mig welded. Bad thing, the drivers and passenger floor boards are too weakened, to be kept. To sort this out, i´ll fabricate some replacement panels the next couple of days. Pictures to compare, before and after.
The floor rot is pretty common. Most all of these trucks have that issue. The replacement panels ae pretty decent, but you usually need to do the inner and outer corners, as well as the "C" channel that goes in between the inner and outer cowl. Truckshop (Counterpart) now makes a very nice one of these...get the ones in black, as the grey ones hardly fit at all.
L O N G Motor ENVY Elky ; Did I remember to say WELCOME GMC FAN ! ? . Yes , I am a BOWTIE GUY being as Chevrolet is better because blah, blah blah....you know the drill . Anyways , YES ! your mighty GMC L O N G motor is so because it's a REAL TRUCK MOTOR unlike the Chevy's passenger car 209 , 216 & 235's are although I love them to death . It's L O N G E R because it has more main bearings (!7!) , the better to suffer toiling up long steep hills & grades (think Alpine Passes) with heavy loads of Bier for the lazy , thirsty Chevy guys waiting at the top . So , forget about the (yawn) V-ate conversion that every one else has , stick with your GMC engine and never have any worries . The GM Dual Hydromatic tranny is *SO* robust and well designed , it was used in tanks during the War and Cadillacs , Oldsmobiles , Lincolns and other heavy , high powered vehicles as well as trucks , just take care of it , always use Dexron or Typ A (if you can find that) ATF in it and change it every year regardless of miliage or every 10,000 miles once she begins liking it and driveing it constantly . You've got a winner there , keep up the hard work , I don't recall the brand name (? Rust Mort ?) of the stuff NATO uses to de rust Unimog side gates but the <magic> ingredient is always : Phosphoric Acid and most home & Hardware stores sell it , dilute it 1 > 3 ratio with water and watch the rust *dissapear* without damaging the good metal , then you can use fibreglas to re inforce it to back AS - NEW strength... Don't let anyone talk you into using Muriatic Acvid as that will eat good metal , Phosphoric can't and is handy for removing rust stains from the cement floor in the shop , the toilet bowl or the shower... I dilute mine with distilled water and strain it through cloth into a jug after each use and save it ti re use over and over... I hope this helps . L O N G Motor Envy is a serious thing , I have come to grips with it , many others cannot , don't wory , we'll forgive your FUGLY grill as long as you forgive our 235's & 12 volt conversions . Besides , who doesn't like picked corn ? . .
Welcome Elky67. Great choice in the GMC. Our host has a lot of parts for our trucks, and the guys here have ALL the answers, too. You're the first person other than My Dad who likes the El Camino. Another good choice. Here in Texas, we have more good weather than bad, so working on, and eventually driving, our trucks can happen more often.
Hi Bilbo, the climate here is a bit of an issue, on the other hand, if we had 365 days of summer, i´d probably never get around, fixing or maintaining any of my toys. Saying is:i´ll do this and that in winter.... As you said, this forum is great, i´m glad, i found it, even if there´s folks here, who are a bit confused, when it comes to front end parts, like grills etc. The El Camino is one nice ride and i don´t mind, being it a Chevy; i like those lines of the 64-67 models. I had a 1976 GMC Sprint a few years ago, which i sold to a buddie. It was more of a compromise then, cause when i bumped into my 67´, i sold the other one immediately. Thanks again for the welcome. Last night, my parts showed up, so now, there´s lots of work...
Yeah you are right! I was just being funny about the trailer queen thing. Since it has been on a trailer twice by me. Once getting it from central nebraska, and the other time was taking it to a body guy to have the door and cowl put on and straightened out.
The way you work your truck is really amazing and an excellent example for all of us to follow regardless which Grille our trucks are clad with.
Panel beating continues... Hi guys, the last few days, i spent the evenings with rotten sheet metal. Like most times, when you attempt, just to put in one panel, you bump into the neighbour, who is also not far, from being weak... So first i cut out the remainings of the outer left cab corner, to better reach the inner corner, which was due too. As the truck is sitting on jack stands, you keep fit, while crawling several times in and out, till all tools are, where you need them After a good trimming of both and welding them in place, i saw, the lower rear pillar was also a bit weak and thin. So i used a piece of the left over of the outer cab corner and fabricated this part myself. Now it´s all nice and solid again, and can hardly be noticed. To get back the patina on the outside, i try to get a light blue rattle can, which seems to be the original color of the truck and blend it in with the gray primer. Now i´m at the front left foot panel, which is a bit more work, to fabricate, but i started last night with it, and i´m half way there. So hopefully tonight, the left side should be well on its way...
Cab floor Hi guys, i´m still working on the cab floor, gladly the left side is coming to an end now. The area around the fuel tank mount showed some thin spots, so more cutting and welding had to be done... The rocker panel and surrounding panels are already primer-ed. Bad news, probably have to do some overtime at work next few weeks, hopefully i find some time, to carry on, as i really would like to get the truck on the road this summer. At least, the rear springs are back in place, with new bolts and bushings, so just put wheels on, and it´s movable again... Sorry, no photo´s yet, not much room underneath, to get some reasonable shots. By the way, thanks everyone for your comments so far.
More sheets... I hope, you all don´t get bored by this, but my cab is still in progress, with more panels to be replaced I don´t want to cut corners, so i rather replace them now and hopefully be good to go the next couple of years without worrying . Our climate is pretty rough, so rust is always an issue, even on newer cars. The left part of the floor is pretty much done, including the new maintenance opening for the master cylinder, that´s about 10 inch back from original hole. At the moment, i´m at the right inner cowl, where the heater attaches to. Lower firewall connecting to floor was also weak in a few spots, but if this is finished, most of the greater damage should be done. Thank you all for patience
Trust me ! We'll never , EVER be bored of this sort of technical post ! . It shows others what to do and how to proceed . Keep it coming ! . GOOD WORK ! .
Hey thanks ccharr!! very cool pics by the way! and yeah we for sure won't get bored by this. Thanks again
Finished floor Hi all, switching back and forth, between mechanical and sheet metal stuff, i´m done with the floor and the right side of the truck. Welded the lower inner door panel, that looked more like a screen behind the weatherstripping. On top of the rust primer, i used a flat gray color, also used on the old BMW motorcycles during WWII. Didn´t want to use flat black, as most rat/hot rods use at the moment. Also ordered the side glass at a local shop today, since shipping of this stuff, made me worry a bit. To put a bit of shine in the cabin, i pressure tested the fuel tank, turned out ok, and finally gave it a flat silver coat, a leftover from a previous vehicle. Nearly forgot: What do you guys think of the tire combo??
Step by Step Hi all, it´s been a while since my last post Still working on the ol´truck, whenever i can. I´ve rewired the whole truck from front to back, which was more work, as i thought it would be; but now, every single bulb is doing its job The interior also got a bit of attention. Since reading various posts about the poor fitting quality of the repop headliners, i decided, to give it a try myself. Not wanting, to use ordinary cardboard, due to warp age problems, when wet, i used some sheets of furniture rear panels, which are similar to MDF, but thiner. It needed a few attempts, to get it right; but in the end, i gave it a coat of flat black with a foo-foo can, i´m happy with the result. Another challenge is the missing heater stuff inside the cabin. Right now, I´m trying to fabricate the panel, that incorporates the heater core; gladly, i had the outer part, to make the match for it... A big surprise, after putting back the formerly broken exhaust manifold, and manufacturing a new oversize throttle shaft for the worn out Zenith, i put some fuel in the gas tank, connected the battery and hit the start button. Didn´t take much and the lovingly looooong motor started to come to life!!!! I was more than happy, to hear the old girl waking up from her spleep... Sorry, no photo´s yet, forgot to bring the camera, but try to take a few shoots tomorrow. Stay tuned
Hi Damon, Thank you, i´ve also been following your thread since beginning; i like your idea, of building a shop truck. That´s what these trucks are made for, and having some kind of lettering on the doors or elsewhere, even more adds to their authenticity. Even though my truck didn´t have any on it, i try to put something on, which has something to do with my job as metal fabricator/welder. It has to be weathered though, to fit the patina look, i´m going for... Good luck with your project
I wonder if you were to mask the area you want your letters painted, cut out the letters, paint them, take a rag and dab at the fresh paint, then remove the tape, if that would give you the desired look? Just a thought.