49 GMC Progress Report

Discussion in '1947-1954' started by e015475, Jun 20, 2015.

  1. 52wasp

    52wasp Member

    Joined:
    Jul 21, 2006
    Messages:
    672
    Location:
    Wilton, New Hampshire
    Phil,
    Very nice. I like it. Having a plan is key, even if the plan changes. The colors appear quite different from one picture to another. I look forward to the outdoor-pictures.
    Mike
     
  2. vwnate1

    vwnate1 Member

    Joined:
    Jan 1, 2000
    Messages:
    11,643
    Location:
    AMERICA !
    Looks nice Phil ;

    When you're out searching for that Cadillac emblem, be sure to use one that has the DUCKS in it........
     
  3. e015475

    e015475 Member

    Joined:
    Mar 13, 2014
    Messages:
    240
    Location:
    Show Low AZ
    Mike - I have both halogen and LED lights in the shop and when I take pictures from different locations, I seem to get different color hues, and maybe like you say, natural sunlight will show the true colors. Getting close to needing a new phone, so maybe the technology will be better.

    Nate - gotta have those French ducks!
     
  4. Lakeroadster

    Lakeroadster Member

    Joined:
    Jan 23, 2011
    Messages:
    1,599
    Location:
    Central Colorado
    Wow.. truck is really turning out nice Phil. Much respect your way.. what a multi talented fella.

    I always learn something here.. this time, thanks to Nate..... Behind the Badge: Where Cadillac Got Its Crest (and Ducks)

    The Merlettes: Commonly known as “the ducks,” these birds appear in trios to symbolize the Holy Trinity, with three on one side representing the nobility of the mother’s lineage and the others representing the father’s noble lineage. The use of the birds comes from the time of the Crusades.

    Merlette, of French heraldry, a duck-like bird with a swan-neck and chopped-off beak and legs.

    John
     
    Last edited: Dec 16, 2017
    50 Chevy LS3 likes this.
  5. 50 Chevy LS3

    50 Chevy LS3 Member

    Joined:
    Jan 14, 2013
    Messages:
    951
    Location:
    Indiana
    Wow, that is interesting. I had no idea. Thanks, Nate, and thanks, John!
    I much prefer the old crest emblem. It's like they just want to erase, everything cool, and historic, these days.
    And they call it, "being modern".

    Steve.
     
  6. 50 Chevy LS3

    50 Chevy LS3 Member

    Joined:
    Jan 14, 2013
    Messages:
    951
    Location:
    Indiana
    Hey, Phil.
    I'm confused. Did you find that cool matching fender welt, at a fabric shop? That is a very nice match.
    I was thinking I would use something similar to the original fender welt, the kind that wasn't beaded. Now, if I can find some beaded welt, that matches, I'll go that way.
    Steve.
     
  7. Zig

    Zig Member

    Joined:
    Oct 14, 2006
    Messages:
    4,860
    Location:
    Pittsburg KS
    All I can say is that is one BEAUTIFUL GMC!!!
    As far as the interior, I look forward to the photos, of course.
     
  8. e015475

    e015475 Member

    Joined:
    Mar 13, 2014
    Messages:
    240
    Location:
    Show Low AZ
    The running boards didn't make it back from the bed-liner shop Friday as anticipated. Should have them tomorrow and put them on the truck this week and take some photos outside. Rained this morning in Phoenix and didn't make it past 62F today. Not a real nice day (yeah, I know - not much sympathy, but really, I almost abandoned my flip flops and shorts for tennis shoes and a pair of Levis today!)

    Lakeroadster ; There's a lot of really talented people out there, and I don't really count myself among them. I do, however, have an abiding curiosity about things and am willing to try my hand at them - sometimes it turns out great and other times, well, not so much. Thanks for the nice words!

    Steve: I went to a local fabric shop and got 4-5 swatches of vinyl fabric and took them to the painted truck to see which ones matched. I bought a couple yards of the best match and had the upholstery shop I'm going to use sew it into welting. The fabric store had several diameters of welt cord too, and I picked the one that seemed to be the right scale for the truck. I wasn't aware the original fender welt didn't have a bead. Like Lakeroadster says, you learn something new everyday around here.............

    Zig: More GMC love coming your way. Bolted in the new GMC grill so it is correct in the aperture, installed the stainless hood strip (another off-shore part I had to invest an hour of labor to make right before it could be used), GMC hood emblems, and installed the new front bumper. Bought a repo bumper filler panel, but had to put a few hours into that to straighten it out so I could use it. I complain a lot about repo parts, but I guess the only thing worse is to not have any parts at all! Need a little gratitude, I guess, and look at the glass half full. It is in the queue for featherfill and primer now, but will take some good pics of the front end of the GMC without it.
     
  9. e015475

    e015475 Member

    Joined:
    Mar 13, 2014
    Messages:
    240
    Location:
    Show Low AZ
    The running boards are back from the bed liner shop. I'm not wild about the black, but this truck is going to get driven and painted running boards would be trashed in fairly short order.
    [​IMG]
    The samples for the leather wrap for the steering wheel came in the mail over the weekend, and it looks like four colors have some possibility. Want the upholstery and steering wheel to compliment the gauges. The bottom pieces are to the 'dummy' radio face I'll build up to stuff the hole in the dash. Will take all this to the upholstery shop this week and see what colors of material they have to compliment the samples .
    [​IMG]

    It should be into the 60s today, so I'm off to the shop to spray Featherfill on the bumper filler for the '49 (and my MG TD fenders and hood). Will install the running boards Wednesday if I can get Wyatt to come over and help me. Once they are on the truck I'll pull it out and take some pics in sunlight where hopefully I'll be better able to capture the true color for the next post.
     
  10. e015475

    e015475 Member

    Joined:
    Mar 13, 2014
    Messages:
    240
    Location:
    Show Low AZ
    Need some assistance.

    To use the factory gauges, I need to install the temperature sender bulb in the LS engine. Does anybody have any fotos of how the original six cylinder block accepts the temp sender bulb?

    Anybody? Thanks in advance.

    Phil
     
  11. Bill Hanlon

    Bill Hanlon Member

    Joined:
    Jun 4, 2002
    Messages:
    2,721
    Location:
    Fredericksburg TX
    I assume that your temp gauge is electric, not the original ether-filled type, because there is no tube coming out of the back of your gauge set. If so, your setup will probably be close to mine. My gauge set is the Woodward series from New Vintage USA. It came with an adapter that fit their relatively small sending unit to the relatively large hole in the head of my stock engine. Here is a picture:
    Sending Unit.jpg
    The top brass piece is the sending unit. The lower brass piece is the adapter.

    Don't worry about the moisture on my engine. Had dense fog overnight and still have very high humidity, but the temp has come up 15 degrees and the engine is still cold causing condensation.
     
  12. e015475

    e015475 Member

    Joined:
    Mar 13, 2014
    Messages:
    240
    Location:
    Show Low AZ
    Nope, it is the original ether-filled unit. The bulb is behind the cluster with the capillary tube coiled up
     
  13. Bill Hanlon

    Bill Hanlon Member

    Joined:
    Jun 4, 2002
    Messages:
    2,721
    Location:
    Fredericksburg TX
    Then you are going to have to find a place on the later engine that is:
    1. Large enough to fit the bulb for the temp gauge and
    2. Near enough to reach.

    Maybe Evan has some ideas.
     
  14. e015475

    e015475 Member

    Joined:
    Mar 13, 2014
    Messages:
    240
    Location:
    Show Low AZ
    I ordered the gauge with an extra long capillary tube. There seems to be a couple of places on the water pump I could machine to install the bulb. How does the bulb seal? What does the hole in the head of the original six look like?
     
  15. Bill Hanlon

    Bill Hanlon Member

    Joined:
    Jun 4, 2002
    Messages:
    2,721
    Location:
    Fredericksburg TX
    Mine is a GMC, but I think the Chevy 6 is the same size. The hole into the head is 1/2" NPT.

    The water pump would be coolest point in the system once the thermostat opens up and gets the radiator warm. What is the normal operating temperature of your LS engine? The 212 degree max of the stock gauge may be about the normal temp of the engine.
     
    Last edited: Dec 20, 2017
  16. 52wasp

    52wasp Member

    Joined:
    Jul 21, 2006
    Messages:
    672
    Location:
    Wilton, New Hampshire
    Phil,
    The driver's side LS cylinder head has a tapped-hole for the stock temp sensor, that same hole is plugged on the passenger side cylinder head. I removed the plug and used that location for my (not original) temp sensor. As I recall, it required the purchase and rework of a brass fitting.

    As Bill mentioned, the stock gauge may not offer the information you require given its range.
     
  17. e015475

    e015475 Member

    Joined:
    Mar 13, 2014
    Messages:
    240
    Location:
    Show Low AZ
    The gauge I have says the max temp is 220F. Previous LS engines I've had with stock thermostats ran about 190-195F. I realize that the factory gauge will have some limitations in an overtemp situation, so I'll have a secondary gauge driven off the OBD2 port and displayed on a tablet or phone in the cab.

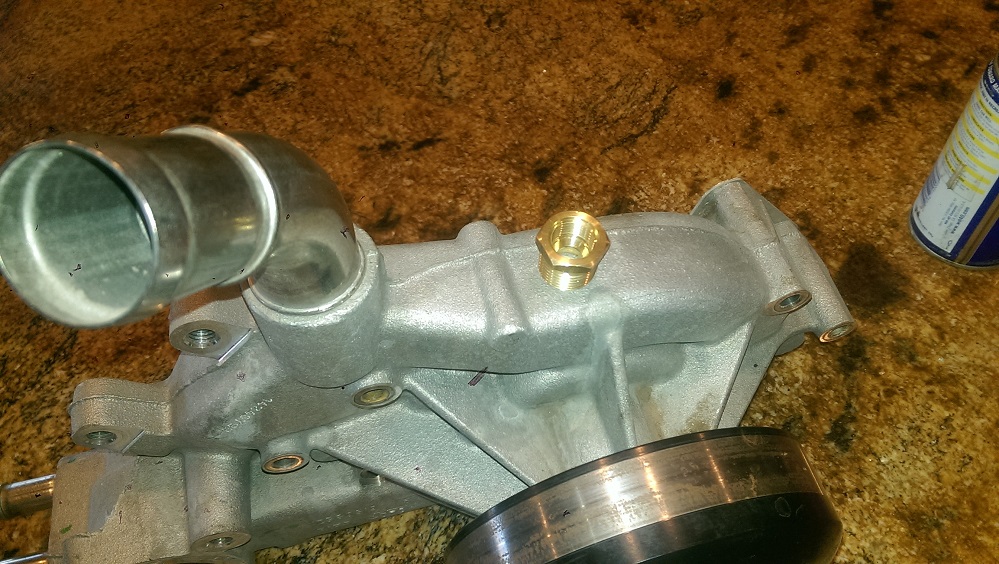
    Mike, both ports on the LS head have M12x1.5 threads, which makes the major diameter of the threads on the sensor about .470"

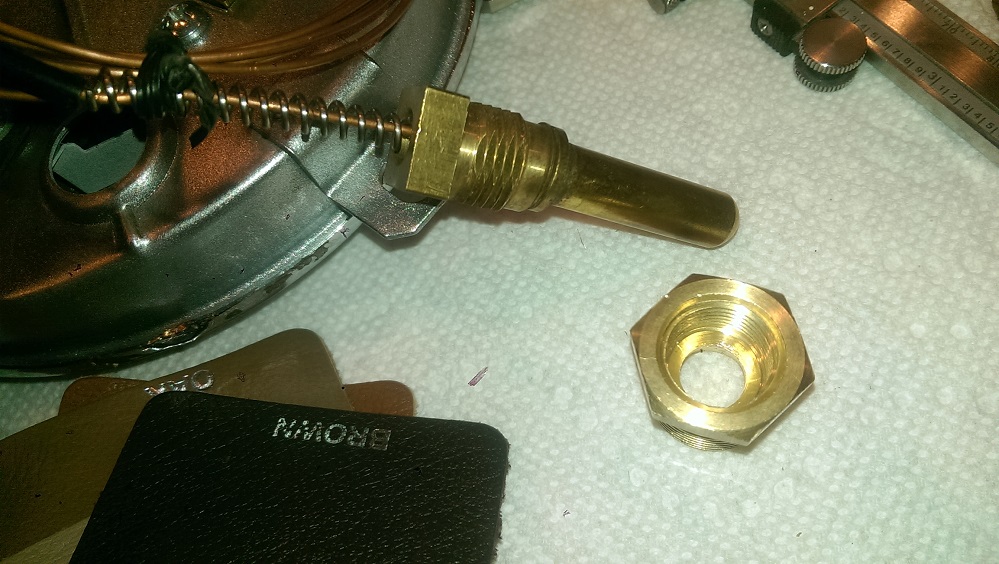
    The threads on the ether bulb sensor from the '49 are 1/4" NPT, and the major diameter of the threads measures .550"

    So with the ether bulb's threads larger than the LS head's threads, there's no possibility of an adapter.

    So I've kind of shot myself in the foot. I can't get a drill into the engine bay to punch the hole out for the sensor in the head so it will take a 3/8" NPT bush down to 1/4" NPT. Even if I could, it doesn't look to me like the ether bulb seals on the threads, but might require a stepped hole.

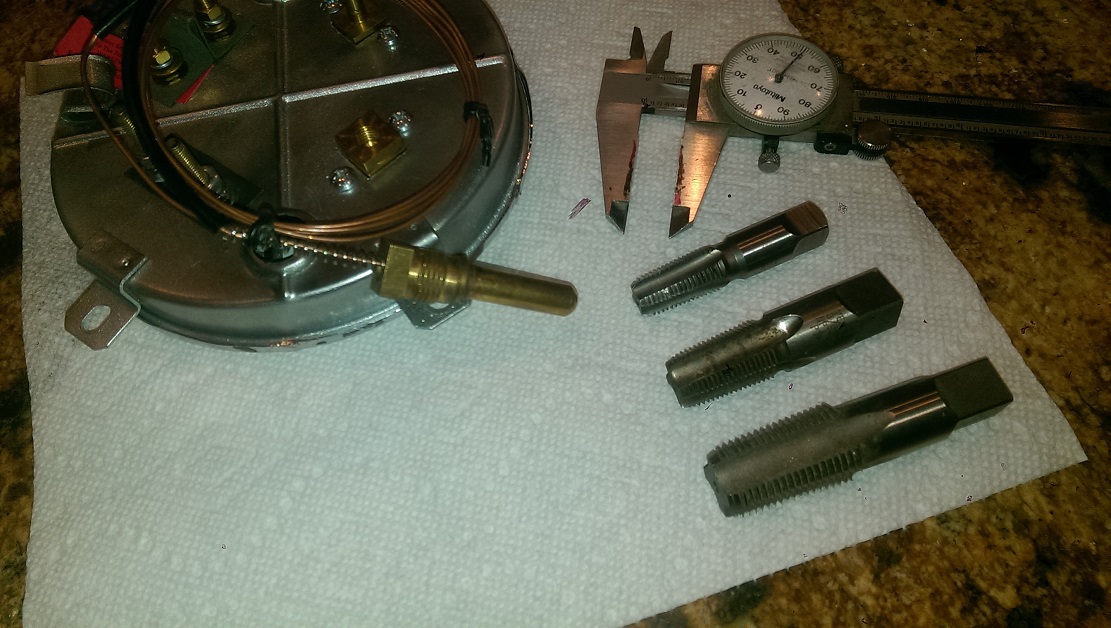
    Here's a picture of the back of the gauge and the bulb, along with pipe taps from 1/4" to 1/2"
    [​IMG]

    A couple of possible work-arounds I've thought of.

    The water pump is very easy to remove, and I could machine a boss for the water temp sensor on the engine side of the thermostat pretty easily - but I need to know what the hole looks like and how the bulb seals. I ordered an extended capillary, but I'd need to check to make sure it will reach the water pump.

    Another possibility is to take one of the freeze plugs out of the back of the head and machine an aluminum plug to replace it and put the boss for the temp bulb sensor in that. The rear of the head is very accessible from the removable tunnel cover from inside the cab. I'd o-ring the freeze plug adapter and put it in with some sealer. For 'belt and suspenders', I'd also make a mechanical retainer using the bolt holes already in the heads. This is a bit of a 'science project' that I'd like to avoid, and would only go this approach if the capillary tube wasn't long enough to reach the water pump.

    Either way, I need to know what the hole looks like in the original engine and how it seals up to be water-tight.
     
  18. e015475

    e015475 Member

    Joined:
    Mar 13, 2014
    Messages:
    240
    Location:
    Show Low AZ
    Mystery solved, I think.

    There's an adapter sold to convert the newer straight 6 head temperature sensor boss to the older, smaller sensor like on my '49. Turns out the thread isn't NPT, but 5/8-18, btw.

    They sell them at NAPA for about $6. Balkamp #701-1798 . The OD is 1/2 NPT and the ID has the lip for the seal on the ether bulb.

    Now all I need to do is find a good place to poke a .719" hole to thread for the bushing!
     
  19. e015475

    e015475 Member

    Joined:
    Mar 13, 2014
    Messages:
    240
    Location:
    Show Low AZ
    Pushed the truck outside to clean the shop - here's some pics-

    Up on the airbags

    [​IMG]
    Another shot. Need a little more adjustment on the hood before I can sit it on the catch.
    [​IMG]

    And another
    [​IMG]

    Aired out
    [​IMG]
    From the back
    [​IMG]

    Phil
     
  20. e015475

    e015475 Member

    Joined:
    Mar 13, 2014
    Messages:
    240
    Location:
    Show Low AZ
    First, something for Zig..........
    [​IMG]
    Making progress on getting the AD gauges to work with the LS motor. Picked this up at NAPA yesterday - adapts the '49 gauge's temp sensor to 3/8" NPT. Had to clearance the internal hole about .015" but it looks like it will work
    [​IMG]
    Will likely mount it here on top of the water pump, being careful to stay away from the impeller. The only problem with this location is that if I ever have to change the pump on the road, I won't we able to reconnect the temp gauge till I get it back home to the shop (but will still have water temp off of the OBD/ELM/cell phone to get me home) This location will also allow me to run the capillary tube under the intake manifold to protect/hide the line.
    [​IMG]
    Next problem.............how to get the gas gauge to work. The Camaro tank is a 0-70 ohm sender and the '49 gauge cluster is 0-30 ohm. It took a lot more thinking about it than it did to solve it. I bought a sender for a '49 in-cab tank and a sender for a Camaro tank and hoped to make a mash-up of the two to get the 30 ohm sender to work in the Camaro's gas tank sender.

    When the senders arrived it looked like the potentiometer were the same dimensions, same tabs, everything. The wiper was at the same height too. I pried the tabs loose on both of them and traded the AD truck pot for the Camaro pot, and it worked great. The only thing that's a little shaky is the insulated strap that transmits the resistance up to the cover. It is just a flat strip of metal about a quarter inch wide. I thought about soldering the two together, but decided I'd get a #6 screw and mechanically fasten the two straps together and avoid dissimilar metals contacting each other in a hostile environment.

    If anybody has any concerns about this approach, please say so!

    Here's the two senders - the AD truck on the left and the Camaro on the right
    [​IMG]
    Here's the hybrid gas sender (with safety wire holding the conductors together till I get a #6 screw and nut)
    [​IMG]
     

Share This Page