• We have upgraded our forum software! See here for details.

Lakeroadsters' Build Thread: '65 SWB Step

05-10-2011: Strippin' The Doors

Stripped doors in preparation for interior paint and installation of glass channels and fuzzies.

Also will be installing GMC Paul's 67-72 push on style door weatherstripping. A member over at the 67-72 Chevy Trucks has used the newer seals and said they worked well. We'll see how they work on my old war-horse.

StrippedDoors.jpg

I kind of like the look without the ventilator... but to me the vents are part of the neat iconic features of these old trucks... they'll be staying.
NoVentilator.jpg
 
Last edited:
As always John nice work..:)

Thanks Rich!

05-14-2011: Painting Interior of the Doors

Krylon Champagne Nouvea Brushed Metallic Paint is what I used. The metallic has more gold to it than the original, but is "good enough" for my ole beater shop truck. As rattle can paint goes this is pretty good stuff, applies nice. This will be the 3rd repaint since the original factory color. Previous owners painted the interior lime green (go figure), flat black and now "Champagne Nouvea" a rather Foo Foo name for what I think is decent color. It really shows all the contours and brightens up the interior.

2167144210103882008S600x600Q85.jpg


Untitled.jpg
 
Last edited:
06-07-2011: Final Installation of Door Glass Weather stripping

Finished up installing the new door glass weather stripping. Quite an adventure, again partly due to the previous owners shenanigans. Found out the drivers side door glass actuator had one of the arms installed upside down. That raised the front of the glass up about 5/8".

Once I fixed that and installed all the new rubber products I am pretty pleased, except for one thing. The window fuzzies just are not designed right, and their quality is poor.

I went ahead and bought the chrome fuzzies because some of you posted that the black ones rust real quickly. Well they sit to low, actually slightly below the window sill door sheet metal. This makes the window in the up position just barely fitting into the upper track molding. And (2) of the retaining clips broke off during installation.

Window fuzzies are made in America by "Repops" in Pearcy Arkansas. I will follow up with contacting them tomorrow.

My question to you guys is do you know of anybody making these that fit in the correct factory location, flush with the window sill door sheet metal?

You can see in this photo how the outer window fuzzy is lower than the door window sill. About 0.160" low in front by the ventilator.
2011_06070045.jpg


2011_06070044.jpg


Untitled.jpg


2011_06070052.jpg


And just for comparison, here is how it looked when I bought the truck. Flat black rattle paint can everywhere....
65ShortStepSeat.jpg


Follow up on Re-pops, see post #304 on page 21:

The guys at Repop talked a good game but never followed through with their commitment.

On three separate occasions I called and talked with the production floor foreman. He said they would send me new fuzzies, free of charge, to replace their defect parts.

They never did send them. As they say, a fella's only as good as his word.

Bottom line is the clips are in the wrong place, from the factory. If they had sent new one's I am betting they would be wrong too.

I contemplated removing the fuzzy's to modify them. Basically using a grinder or cut off wheel to trim down the bottom of the steel part of the fuzzy to achieve the correct window vertical location when rolled up. But to do that you'll have to remove the glass, remove the fuzzy, and you can bet more of the clips will break off when it is removed. Pi$$ poor, by any measure.

Repops products are typical of most aftermarket parts... look similar to OEM, the fit and finish is "reject" quality, install reveals issues, customer service is lacking.

Reject quality? I was told that back in "the day" replacement body panels from "GM" were rejects from the factory floor, basically defective or damaged parts. They were stored and sold as replacement parts. That's what I mean by "reject" quality.
 
Last edited:
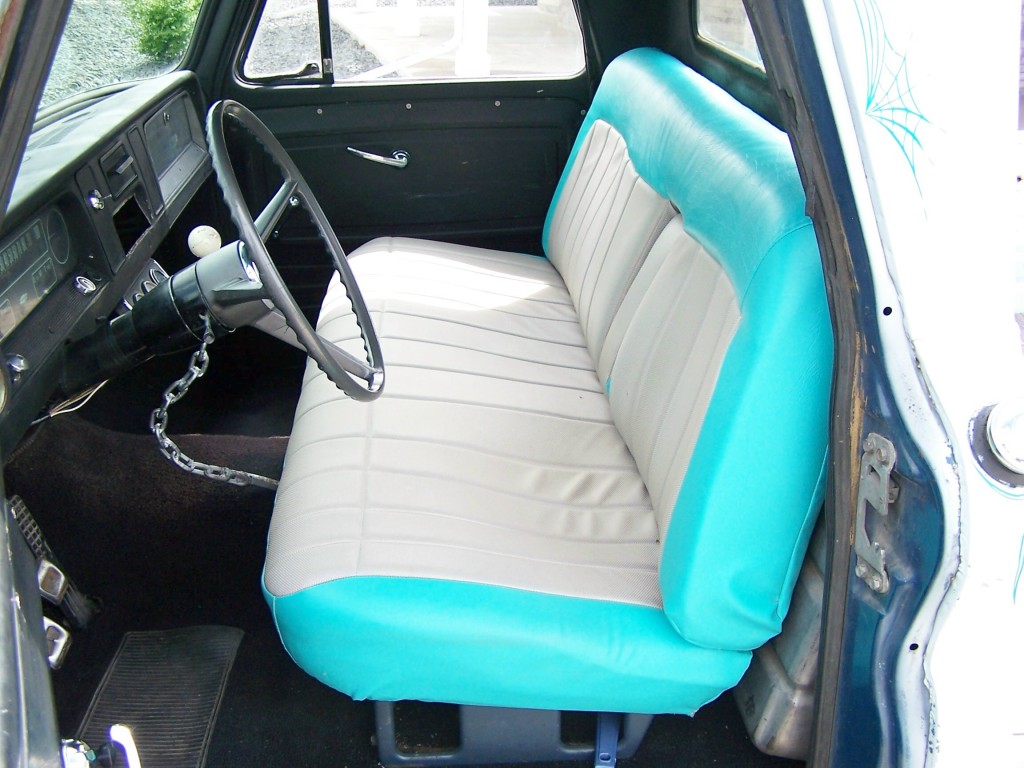
Your interior looks great, I can't believe its only an aerosol paint job!

Is that the factory steering column with an aftermarket wheel?

Thanks Leyland. Interior paint came out better than expected. The key was lots of coats and a good quality spray can, Krylon sprays quite good.

I refurbished the stock steering column, painted it gloss black and used a Grant walnut wheel. See post #26 for additional information.
 
Last edited:
The Grille March 2010
On the Custom Classic Trucks website I saw a photo of stock grille with stainless bars (see the first picture below). Very clean... I want to replicate that look.

First step was to cut out the stamped steel mesh. I used my air grinder and a 4" cut-off wheel.

Next was fab'g. up some mounting brackets for both sides out of 1" angle. These were drilled for (5) 3/16" dia. stainless tubes.

Next step is to make a mounting bracket for the center and then procure some stainless 3/16" tubing.


I really like the grill.
Some of the 64-66 trucks I looked at before finding my 66 service truck had rusted out in that grid area. What you've done is great solution if one didn't want to have to find a grill in better shape.
 
06-15-2011: Fauxtina Paint, Post #1

I started the patina process, and the step side bed is the "test bed", so to say. The process has thus far been a one step forward, one step back process.

First step was to clean all the "Gibbs" off the parts that I had covered them in last November (basically just wiped the parts off with xylene). The Gibbs did a really good job of protecting the parts for the last 7 months.

The plan is to go with Sherwin Williams Industrial products. There is a Sherwin Williams nearby and when I explained to the guy that manages the store what I was doing he seemed genuinely interested in this project. He set me up with some Sherwin Williams Kem-Flash Primer E61 R 26. When I first started using it I realized it dries way to quick, which makes brush and roller application practically impossible (Remember its a Patina paint job... that's how it's done). So then I read the "Application Data Sheet and it specifically states "spray only due to short dry time" (imagine that, :dohh: read first dummy! ) It's also too red (see photo below), needs to be more of a brownish tint for the patina effect to look correct.

Using my trusty "strip disc" and angle grinder I removed the 3 day old Kem-Flash. In the process I realized just how good the primer adhesion was. It took roughly twice as long to remove the new primer than the original paint and primer.

Next up: Sherwin Williams Kem Kromik primer. It is slower drying and is more of a brown shade of red oxide primer.

Bare with me on this guys. I know some of you think faking weathered paint is dopey, and using a brush and roller is even worse. But its a challenge I want to try.

Here are some sketches and a couple photos, lots more to come as things progress....


My Amateur Conceptual Sketch
PaintConcept.jpg


Parts ready for primer
StepsideBedComponentsPreppedforPaint.jpg


Removing the test coat of primer
SherwinWilliamsKem-FlashPrimerE61R26Test1-2.jpg

SherwinWilliamsKem-FlashPrimerE61R26Test1-306-15-2011.jpg
 
Last edited:
06-17-2011: Fauxtina Paint, Post #2

Primed the step side bed components today with Sherwin Williams Kem-Kromik brown (red-oxide) primer. It really lays down nice and the color was spot on, at least IMO, for "Hot Rod Primer". Used a 4 inch roller and a brush and will be applying at least one more coat.

2011_07100004.jpg


2011_06170007.jpg


2011_06220015.jpg
 
Last edited:
Some nice looking welds

I check your discreptions and pictures great job very nice work and truck, I had a GMC 64 with the pontoon hood, 307 v6 a tank of a truck.
 
06-21-2011: Fauxtina Paint, Post #3

I checked your descriptions and pictures, great job very nice work and truck....

Thanks Steve​

Rolled on the second coat of primer yesterday (in-process Faux-tina). The extra thickness and texture is needed so that, after application of color, the primer will show through the paint after sanding.

2011_06170008.jpg


2011_06220016.jpg


2011_06170003.jpg


2011_06220014.jpg
 
Last edited:
06-26-2011: Fauxtina Paint, Post # 4

My wife wanted a 'preview' of the finished fauxtina look and I figured the tailgate was a good place to do that. We both like the red-oxide primer so much we toyed with leaving it primered (When I first bought the truck that was my plan).

Added some color to the inside of the tailgate, Rustoleum Orange rattle can. 320 grit sanding to follow.

2011_06260003.jpg
 
Last edited:
06-28-2011: Fauxtina Paint, Post #5

Here is what the inside of the tailgate looks like after sanding with some 320 grit. I need to knock down the gloss in the crevices with some red Scotch-brite pads.

Pretty stoked about how this turned out as it just what we were looking for.

2011_06280002.jpg


2011_06280003.jpg
 
Last edited:
07-10-2011: Fauxtina Paint, Post #6

Finally got around to spraying the color coat on the stepside bed components.

I see a lot of sanding in my future :rolleyes:

2011_07100007.jpg
 
Last edited:
Back
Top