• We have upgraded our forum software! See here for details.

Lakeroadsters' Build Thread: '65 SWB Step

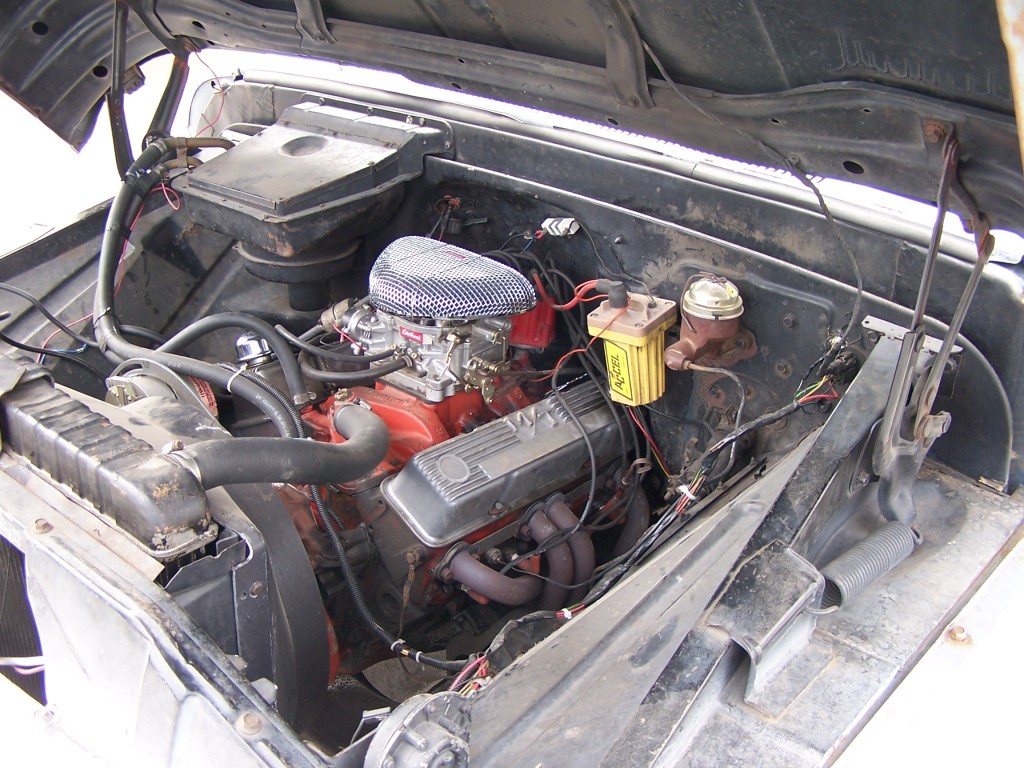
So wacha got under the hood?

A high mile (and mile-high :)) "Factory Fresh" 350 (circa 1970), Edelbrock Carb and Full Length Headers....

with old school M/T valve covers and a go fast screamin yellow Accel Super Coil ;)

(I'd really like to do a tunnel ram with dual fours and fenderwell headers.. maybe someday.)

100_6017.jpg
 
Last edited:
Looks Great

Lakeroadster,


Your truck looks great, the documentation is outstanding, at one time I had the 1961 GMC with the big "V" six, (30 years ago). Your project is comming along fine, after the bumpter what next, (just wondering what's your plan)

Is the profile of the hood pasted the bumpter profile? just wondering,

once again great job.
 
Is the profile of the hood past the bumper profile? Just wondering.

Thanks for the post Steve. Funny you should mention the bumper location.... Yesterday the wife came out to the shop and was admiring my handy work ;). She asked the same thing.

So while she was there I got out my level and moved the bumper forward, far enough so it would be the farthest point out. It looked hideous.

It's a form over function thing. Kind of like the old split bumper 70 1/2 Camaro's or the flimsy nerf bar bumpers folks used to use. Logic dictates that the bumper has to be the farthest part out in front.... but the Hot Rodder in me says Rules Are There Ain't No Rules. :cool:


In regards to "what's next" I need to finish the orange paint on the cab, then do some mechanical stuff like fixing a leaky rear pinion seal. It's all good!
 
Last edited:
Radiator Support Mounts and Bumper Bracket Attachment 04-07-2012

The OEM radiator support mounting bushings needed replaced. I purchased an aftermarket kit that came complete with bushings and mounting hardware from our site sponsor. An air chisel was needed to get the old mounts removed from their 47 year location. The new mounts raised the doghouse about 1/4".

2233432590103882008uZGkoa_fs.jpg


Now that the doghouse is back up to the correct height I finished locating the bumper brackets on to frame, fit-up the brackets to the bumper and tack weld them in place. Here are a couple photos of the truck after everything is in place.

PipeBumper04-07-2012004.jpg


PipeBumper04-07-2012005.jpg
 
Last edited:
Thanks Charles!

I did some final adjustments on the bumper today and took a "blue sky day" photo.

And in the unlikely event "Johnny Law" hassles me about a front plate, I roll formed the plate and drilled and tapped holes in the bumper. I don't like the look, but I'll have the option if needed.

FrontPlate.jpg
 
Last edited:
looks good i like it. not so much on the tag but i know were your at you have to have a front plate. But still looks good!:cool:
 
On my drive home the other day I spied a turquoise piece of sheet metal laying near an intersection. I told the wife, "that looks like a cowl corner for a 64-66truck! We turned around at the next intersection and sure enough it was the drivers side cowl corner off a '66. The wife jumped out and tossed it in the back of my truck.

It's in very good shape, only minor surface rust, no pitting. These are about $100 for repro Chinese parts.

Go figure... guess I had some good karma?

RoadsideFindCowlCornerTop.jpg
 
Last edited:
Cowl Corners

?? do they rust out or summat ?? .

I remember back in the late 1960's folks would chrome then , it looked awful but style is weird sometimes .

Too bad you didn't see the truck loaded with old parts headed to the dump that your new corner piece fell off of.....
 
I learned the secret many years ago when many vehicles were still 6 volts :

Clean and de rust the reflectors and mask them off , paint gloss white ~ many foolishly use silver paint but gloss white reflects better so the whole lens lights up very brightly , even with regular bulbs .

Your truck is looking very good indeed ! .

vwnate1: Excellent on painting the reflectors inside the tail light assemblies. Mine were a mix of solid black paint and surface rust. I did as you suggested and it really made a difference. I'm going to do the same on the front park light assemblies as well.

Lakeroadster: Outstanding build with your pics and text. I'm learning a lot from your thread and my '66 C10 will benefit from it. Thanks for sharing. :D

Azbagger
 
Dash Cover Ideas

I never really contemplated a dash cover until I moved from Ohio to Colorado. The sun is so intense that many folks out here use them. I found a company that makes dash covers for our trucks, best part is they are under $40 bucks.

Here is a link to their website: http://dashcare.com/c-everything.html


The company will send you (3) material samples to help you decide what color / material type best fits your fancy. They have over 60 different types.
 
Last edited:
Dash Covers

Yep ;

They're nice ! .

Remember though : a dark color absorbs more heat & U.V. so consider getting a light color or those reflective things that fold up when not in use .
 
Charcoal is the color I'll be using, it is a good match with other interior components.

And one of those shiny reflector things for the windshield :eek: those are a couple decades too new for my old time capsule, plus it will keep people that walk by from seeing the hood louvers reflecting in the chrome dash mounted tach. :D

Remember Nate, it's an old Hot Rodded truck, not a Prius. :cool:
 
Last edited:
Prius , Shmirus

Once you try one of those fold up things , you'll love it ~ they reduce in cab heat and stop UV damage to the interior and seats , dead .

Plus , you can now sleep in it in the direct sun ! just open the windows for cross ventilation and stick yer feets out the window .

Yes , I do this in all my oldies .
 
Yeah I know, Nate. I have them in my daily drivers, and have done so since the mid 1980's.

I was using them back when they were made of cardboard. They were required to protect the crappy grade of plastic GM uses, especially during the 70's and 80's.
 
Last edited:
Fauxtina Paint Post #14

Prepped the cab and doghouse prior to rolling on the first rolled on coat of primer.

06-09-2012001.jpg


06-09-2012002.jpg

Decided to paint the lower portion of the radiator support (grille surround) textured black to match the front bumper.

06-09-2012003.jpg
 
Last edited:
Patina Post #15

Rolled on the 1st and 2nd primer coats on the doghouse, cab and cowl. These primer colors where used by the factory, thus the "plan" is to use them so I can attempt to replicate a natural looking patina.

06-16-2012001.jpg


06-16-2012002.jpg

Here are some photos I am using as a guide. This 1963 belongs to Chad Mcdonald. He was gracious enough to send me some close up photos:

1963CHEVY002.jpg


1963CHEVY003.jpg


1963CHEVROLET004.jpg


1963CHEVROLET003.jpg


1963CHEVROLET001.jpg


1963CHEVROLET015.jpg
 
Last edited:
Patina Post #16 06-24-2012

Rolled the orange paint on the cab and dog house. Sanding and deglossing to follow.

2768281910103882008aYrgNT_fs.jpg


2177984980103882008fLMYzN_fs.jpg
 
Last edited:
Back
Top