Looks like my pinion flange seal needs replacement, looks like I may need two special tools to complete this repair? As indicated in the shop manual. Anyone have experience with this, stock 3:38 I think if I remember correctly? six lug. 1/2 ton axle.
-
We have upgraded our forum software! See here for details.
You are using an out of date browser. It may not display this or other websites correctly.
You should upgrade or use an alternative browser.
You should upgrade or use an alternative browser.
Pinion Flange Seal Replacement
- Thread starter steve
- Start date
got some info page 13
Did a search, got page 13 of Lakeroadster's build page.
Mark everything, measure threads, (or count) remove big nut, (not a family member), use a puller for the pinion. Pull seal, clean all with break cleaner, beat new seal in with hammer. (joke), replace pinion as marked.
I order my seal yesterday, from our host. thank you host.
Seal
I do not have a fancy tool to remove the flange. I do have an inch pounds torque wrench. In the past I used a pipe wrench to hold the flange while removing nut. Always worked for me. Never had any real trouble removing the flange. I have a seal installer set, makes it easy to get a seal in without destroying it. Good luck with your seal.
Gerald in Florida
Lakeroadster
Member
Re-post of Pinion Seal Replacement, Post #1
As Steve eluded to above, and just in case somebody else needs replace their pinion seal, here's how I did mine back in Aug. 2012:

^^^^Center Punch the yoke, the nut, and the pinion shaft. This ensures that after you remove the nut and yoke you can re-assemble them in the same orientation, and tighten the nut to its original torque. After I center punched them I used a paint pencil to make the center punched spots easier to see.

^^^^Next step is to use a dial caliper against the face of the pinion shaft and down to the machined surface of the hex nut. This measurement will be used after re-assembly, again to ensure it is the same as original.

^^^^Write down the dial caliper readings.

^^^^Now we're ready to remove the nut and washer. I used a 1-1/8" six point socket and an impact wrench. Man, that sucker was on there! I think I need my teeth fillings tightened now. I used a harmonic balancer puller to remove the yoke. This came off easily; it and the pinion shaft are splined.

^^^^Here's the bad pinion lip seal. Since it has a full face flange I removed it with chisel by tapping it slowly from behind the flange, it came off easily also.

^^^^With the lip seal removed you can now see the pinion bearing. At this point I hosed off everything with brake cleaner and wiped the shaft and bore with a shop rag.

^^^^Here's the old lip seal, the yoke, the nut a flat washer. Notice the flanged type lip seal.


^^^^And here's the new lip seal box. It shows the cross-reference part numbers of other seal manufacturers.
As Steve eluded to above, and just in case somebody else needs replace their pinion seal, here's how I did mine back in Aug. 2012:
^^^^Center Punch the yoke, the nut, and the pinion shaft. This ensures that after you remove the nut and yoke you can re-assemble them in the same orientation, and tighten the nut to its original torque. After I center punched them I used a paint pencil to make the center punched spots easier to see.
^^^^Next step is to use a dial caliper against the face of the pinion shaft and down to the machined surface of the hex nut. This measurement will be used after re-assembly, again to ensure it is the same as original.
^^^^Write down the dial caliper readings.
^^^^Now we're ready to remove the nut and washer. I used a 1-1/8" six point socket and an impact wrench. Man, that sucker was on there! I think I need my teeth fillings tightened now. I used a harmonic balancer puller to remove the yoke. This came off easily; it and the pinion shaft are splined.
^^^^Here's the bad pinion lip seal. Since it has a full face flange I removed it with chisel by tapping it slowly from behind the flange, it came off easily also.
^^^^With the lip seal removed you can now see the pinion bearing. At this point I hosed off everything with brake cleaner and wiped the shaft and bore with a shop rag.
^^^^Here's the old lip seal, the yoke, the nut a flat washer. Notice the flanged type lip seal.
^^^^And here's the new lip seal box. It shows the cross-reference part numbers of other seal manufacturers.
Last edited:
Lakeroadster
Member
Pinion Seal Replacement, continued...

^^^^I applied some Gear RTV Sealant to the lip seal o.d., and grease into the lip seal, and then installed the seal. The flange made installation easily, just tapped it in with a ball peen hammer, slowly tapping all around until it was seated in the housing bore.
Reinstalled the yoke, the washer, the nut, and tightened the nut to its original location, as confirmed by the center punched marks and the dial caliper reading.
Flushed the rear gears with brake cleaner, wiped the sealing surfaces with a shop rag, applied Gear RTV sealant to the cover I refurbished and bolted the new cover on. Filled the housing with 85W90 gear lube.
Good for another 47 years")

^^^^I applied some Gear RTV Sealant to the lip seal o.d., and grease into the lip seal, and then installed the seal. The flange made installation easily, just tapped it in with a ball peen hammer, slowly tapping all around until it was seated in the housing bore.
Reinstalled the yoke, the washer, the nut, and tightened the nut to its original location, as confirmed by the center punched marks and the dial caliper reading.
Flushed the rear gears with brake cleaner, wiped the sealing surfaces with a shop rag, applied Gear RTV sealant to the cover I refurbished and bolted the new cover on. Filled the housing with 85W90 gear lube.
Good for another 47 years
Last edited:
Seal
Wow!!!! Lakeroadster. you did a great job of instructions and pictures. Your skill with cameras and computers is far beyond my meager abilities. I am too dumb to use a smart phone. My cell phone is just that, a phone. If I could get one with a rotary dial I would buy it.
If I need help in the future I hope you reply to it like you did here.
Gerald in Florida
Lakeroadster
Member
A Wise Man Learns From The Mistakes Of Others ...
Thanks Gerald... always glad to help!
Thanks Gerald... always glad to help!
Lakeroadster
Member
Waiting on my seal, I think I can pull this off, no pun intended.
Easy - Peasy - Lemon - Squeasy
Other than the gear oil stank it's all good

Pinion Seal Replace
As always , John is good at doing as well as explaining things .
Me , I'd use a bit of pipe the same diameter as the new seal as an installer because even *one* small dimple on the seal whilst knocking it in , will create leaks .
There's also a " rocker " typ of seal remover , I have a 40 year old one made by K.D. Tools , it looks funny but works really well .
Taiwanese seals ?! you're kidding .
I buy new seals & bearings off E-Bay and never use the Chinese stuff , cheaper too .
Adding a magnetic plug is wise , they're 1/2" NPT and cheap on the Internet ~ I need to find a good source as my old box full of them is empty and I need more .
Lakeroadster
Member
Put the hammer down and walk away from the oil seal....
Great advice by Nate... I usually use a socket as a tool to install oil seals, place a socket that is the same O.D. as the oil seal on the oil seal flange and then tap on the socket with a hammer, not the seal itself..
But in the case of the pinion seal above, I darn near pushed it into position by hand.
Your fit may vary
Thanks
Still waiting, appreciate the support, I think I got down. Nate has a point, I must say, I get a lot of parts from our host, but was disappointed with some of the cheep rubber gaskets, like the filler neck rubber ring dry rotted while sitting in the garage over two year period.
Still waiting, appreciate the support, I think I got down. Nate has a point, I must say, I get a lot of parts from our host, but was disappointed with some of the cheep rubber gaskets, like the filler neck rubber ring dry rotted while sitting in the garage over two year period.
Lakeroadster
Member
Taiwanese seals ?! you're kidding. I buy new seals & bearings off E-Bay and never use the Chinese stuff , cheaper too
I bought the pinion lip seal at my local NAPA. For big ticket items I search for USA made parts, for routine maintenance I go to NAPA. The guys there are locals, supporting their families off my and other local motor-heads endeavors.
Just trying to spread the wealth around.... That's a joke.... you get that.... right?
So Nate, when you buy oil seals off Ebay, how do you know the country of origin? I'm only asking 'cause I'd like to follow your lead.
Last edited:
Received Seal
Well, received my pinion seal from our host, as ordered, quick, it's amazing for five bucks, Taiwan can make, and ship for cheaper then if you can find US made items. Some US made on the net were selling for over 50 bucks, of course them are made by grownups, making a decent hourly rate, in facilities that meat code requirements etc. (small rant) now need to gather my tools and start.
On another note, I'm be the first one to support US made items, but were selling out everything. Where is my socket and breaker bar.
Parts Supplies & Suppliers
NAPA is a very good supplier indeed ! there's a tiny NAPA store near me and I throw them a lot of parts biz as I too always try to support my local Business Men , right until they give me the Okey-Doke or lie to me etc.
The guys @ my NAPA are real Honest To God Parts Men they know their job and care about their Customers , I love 'em .
Once you know the correct part number (usually off the old seal / bearing before removal) , I can then go OnLine to source it , E-Bay will always have multiple vendors , the better ones will have good pictures showing you the details and where it was made or you can ask .
Anything in a modern box is a total crapshoot ~ in My youth " Timken " always meant the very best and was never made anywhere but America , that was a big part of their advertising through the early 1980's .
You have to be diligent .
I also go to lots of Auto Jumbles and when I see N.O.S. bearings & seals I know fit vehicles I own or regularly work on , I buy them , usually for pennies on the dollar as the sellers rarely know what fits what .
I offer $1.00 or so and when they give me the usual razz-matazz about ' do you know what this co$t$ at the store ?! ' I reply , do YOU have any idea what it fits ? did you pay anything for it ? do you see anyone else offering you ca$h money ? . ' then I walk away , if they don't want to sell that's fine , there's always plenty more in the next aisle or on E-Bay , Amazon etc........
99 % of the time they come running after me and I buy for whatever price I offered .
FWIW , I also use King bearing and Applied Industrial Techniques as both places can get my C3 bearings for the same price as regular partshaus' sell the cheapo stuff .
Example : all my English BMC cars use semi - floating rear axle bearings so I use double sealed C3 spec. bearings now and not only do they never wear out , fail , I don't have the oily rear brakes endemic to old British cars when new .
Rear End rebuild
I may have some extra pinion yolk play, so thinking of rebuilding my rear end. I understand the principles behind it, some great "Tom's rear end video on the net" so anyone have any advice?
I like my stance, the with and I think it's a strong stock rear, I do believe my gears are the 3.90 an option for the 1/2 ton 1959.
Update and Question
The nut was marked and removed, the yoke was marked and pulled, came off easy. The old seal was a treat to remove, It has a lip that was seated in a groove, I had to rip the seal out and then vice grip the remaining metal in the groove. You know, with vice on tight hit vice with hammer. "works for me". The removed seal was like a rag type no rubber, so got to be the original stuff.
Remove nut and washer, remove yoke, remove (and destroyed) seal. Then there was a big washer, NOW THE QUESTION there was a small spring right behind the large washer, BUT it was used like a washer, not like a spring (?). This ant in the book? I did order new front pinion bearings. Any comments would be great.
Last edited:
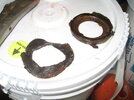
Some pictures
I know we all like the pictures, here are some from this weekend. The bearing is from Taiwan, just out side of New Jersey. Second picture is the leak. The third picture is the destroyed bearing seal.
The fourth and fifth is the spring that is not listed in the shop manuals. New bearings and race on the way.")
I know we all like the pictures, here are some from this weekend. The bearing is from Taiwan, just out side of New Jersey.
Second picture is the leak. The third picture is the destroyed bearing seal. The fourth and fifth is the spring that is not listed in the shop manuals. New bearings and race on the way.
Attachments


Well I Knew that!
Well looks like that spring is part of the old seal just sitting there, the new seal has a spring to hold the rubber sear tight against the shaft? Doh!
Also the seal I received from our host is incorrect I think I need past number 411330N, the one I received is to big?
Well looks like that spring is part of the old seal just sitting there, the new seal has a spring to hold the rubber sear tight against the shaft? Doh!
Also the seal I received from our host is incorrect I think I need past number 411330N, the one I received is to big?
Attachments


Pinion Seal Replace
Not sure why you'd replace the bearing ? .
You are correct , that spring helps to hold the seal's lip in tight .
if you look closely at the exterior of the old seal , there will be the correct part # in tiny raised letters / numbers on it...
Not sure why you'd replace the bearing ? .
You are correct , that spring helps to hold the seal's lip in tight .
if you look closely at the exterior of the old seal , there will be the correct part # in tiny raised letters / numbers on it...