• We have upgraded our forum software! See here for details.

Haasman's 1951 3100

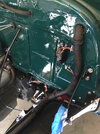
Currently working on pedals through the firewall. Why would the pedals not align centered in their holes in the floor, left to right?

attachment.php


Finally worked it out with washers between the pedals on the pedal shaft. The washers are called "industrial washers". They are thinner and the ratio between the inner and outer sections is much less than an standard fastener washer.

Tried alternative types of sealing on the pedal shafts, didn't work real well. Most likely go back to OEM felt style.

This all continues to be a learning experience for me. Often right when I think I will be able to start on the "candy" (dash gauges, glove box, lights etc the pretty things) I am thrown another curve.

I have been enjoying the challenges. Have had to almost contiuously find solutions to unforeseen problems of fit, adjustments and/or best ways to do things. Its been very interesting so far.
 

Attachments

  • Pedals firewall-offset.jpg
    Pedals firewall-offset.jpg
    68.9 KB · Views: 922
Last edited:
truck looks awesome

I looked back and was unable to find it what disc break seet up with the master cylinder ? also where did you find your heat or sound shield you put inside your cab ?
Thanks Robert .awesome build by the way
 
I like the chassis job. Looks like mine did when i started back in the day. Im also running solid axle and dropped leaf springs all around. The sway bars help like crazy. mine tracks like its on rails and you can turn so hard without it leaning or cutting loose. If you have any bumps around the corner then its a different story. Not sure if you have one installed in the rear also.
 
Last edited:
Your build looks excellent! I really can relate with your experience, as I am continually thrown curve balls on my project as well! The zip lock bags is also something I did that is incredibly helpful!
The color looks amazing! The same kind of green I found on my 55 1st Series when I sanded through the 10 layers of paint it had!

Keep the pictures coming!
 
Back to work

Took some time off from the project. Needed to get out of the cold garage and just take a break.

Back at it again. Almost done with the wiring.

attachment.php


I decided to cover the new wiring harness that was wrapped in plastic electrical tape in a fabric loom. I used heat shrink tubing to close off the ends.

attachment.php


Haasman
 

Attachments

  • IMG_1300.JPG
    IMG_1300.JPG
    427.2 KB · Views: 733
  • IMG_2774.JPG
    IMG_2774.JPG
    222.1 KB · Views: 739
Last edited:
Electrical Details

Looks GREAT that way ! much better than plain old plastic covered harness .
 
I installed the fuel tank, lines and electricals to the sending unit.

Following Nate's and other's advice, I put this fuel shut-off under the tank this week.

attachment.php


Haasman
 

Attachments

  • 51 Chevy Truck fuel tank drain petcok.jpg
    51 Chevy Truck fuel tank drain petcok.jpg
    55.9 KB · Views: 604
Last edited:
What a nice truck! I think your hard work is going to result in a "better than new" pickup!
I love that the bottom of the floor and firewall are finished as well as the outside.
 
Thanks Steve. As I have posted before, never have done anything like this. I decided I wanted to take my time and do as good a job as possible. I have a friend who is a renowned auto restorer on the west coast. I figure if I could even get close to what they do, I would be happy.

Although this project has taken five times longer than I ever imagined ... and it has taught me many lessons ( ! ) .... I am really looking forward to it being completed and finally driving it. Can't wait.

Haasman
 
Absolutely!!! Wow, that truck is looking SO nice!!!
Thanks for the update! So close, right?
 
interior heater motor cover

Here's another little project on the truck that ended up quite good, but threw me for months ... The interior heater motor end that protrudes through the firewall.

After rebuilding the heater assembly and replacing the motor, I spent a lot of time looking at pictures and saw that a seal secures and locates it typically. After seeing all the moisture/water damage from weak seals from the firewall I decided to try and completely cover the end of the motor. (Much easier said than done)

I looked for months to find a piece of metal I could form and shape. After many failed attempts I stumbled across a piece of restaurant equipment that caught my eye. Here's what I started with:

attachment.php


I then had to "work on it":

attachment.php


I then keep working the edges to be round, then cleaned it up and had it powder coated at a friends place. Next because I didn't have enough clearance from the firewall to the cover, I bought a piece of 1/4" thick rubber. Perfect! Cut it out to match the cover.

And finally, here it is installed. I think it looks great!

attachment.php
 

Attachments

  • Heater motor cover-start.jpg
    Heater motor cover-start.jpg
    55.5 KB · Views: 569
  • Heater motor cover2.jpg
    Heater motor cover2.jpg
    128.1 KB · Views: 584
  • Heater motor cover-final.jpg
    Heater motor cover-final.jpg
    64.9 KB · Views: 652
Last edited:
Back
Top