Hello, My Name is...

Discussion in '1947-1954' started by RidesWithYah, Jan 10, 2011.

  1. RidesWithYah

    RidesWithYah Member

    Joined:
    Jan 10, 2011
    Messages:
    309
    Location:
    Lexington KY
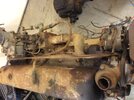
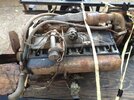
    Took yesterday off work to pick up a 270. This one is out of a '48 (1.5 Ton?) Fire Truck from a small town in SE Tennessee, with, I think, about 100k miles on it. No obvious signs that it's ever been apart, at least to my untrained eye. Hopefully it was regularly maintained.

    It turns over easy. Looking forward to getting it started and checking compression. Not that I think 1/32" on the bore or 1/16" on the stroke is a huge advantage over the 261, it's just that I'm hoping to get away without rebuilding this one. Will also be on the lookout for a vintage intake, and weighing carburetion options.

    Moving the radiator to the front of the support looks easy enough, so I'm not concerned about clearance there. What's the best way to accommodate the added length in the front motor mount? The frame is tapered in the area of the cross member, so I can't just slide it forward. Just make a simple rectangular steel plate with two sets of holes in it? (One to the motor, one to the frame, and cantilever it out?) Other things to watch out for when swapping the Jimmy engine into a Chevy frame?
     

    Attached Files:

  2. RidesWithYah

    RidesWithYah Member

    Joined:
    Jan 10, 2011
    Messages:
    309
    Location:
    Lexington KY
    Found some notes on fitment for anyone contemplating a similar swap at this link:

    Radiator: The 302 engine "is" 1 ? to two inches longer than the 235 (which is longer than the 216). This means that the radiator no longer fits into its original location. I tried to modify the radiator mount to put the radiator inside. Don't even try. The radiator needs to mount on the front of the mount. This means that you will have to borrow your neighbour's "Saws-All" with a metal cutting blade and cut away the top and front cross bracing on the radiator support, the lower front wind deflecting metal-work at the bottom (behind the grill) and drill 6 new holes in the mount for the radiator. The upper support that contains the hood latch will need to have a rectangle cut in it to fit the top of the radiator in it as well. I now have about 2 inches clearance between my water pump pulley and the radiator. I use an electric thermostatically controlled (pusher) fan in front of my radiator. It's quieter, doesn't rob the engine of power (better mileage) and the water pump may last longer without the fan blades. Note: My friend and neighbour has a '51 GMC. I have measured his engine compartment. From his bellhousing to the radiator flange he had 4 more inches to play with, so I'd bet that he originally had a longer GMC engine (he runs a Chevy 235 now) and that he could make the conversion to a 270 or 302 without any cutting being necessary.

    Front mount: Yes the 302 engine "is" 1 1/2 to 2 inches longer than the 235. The front mount on the Bus' 302 was a weird set-up, which caused the engine to sit at an angle (like a Chrysler slant 6). This saved some height in the bus' engine compartment. However, after removing the bus setup spacers, I found that the two bolt holes on the mount (on the bottom of the timing cover/block) were at right angles to the block and aligned perfectly with my truck's original 216 mount so I was able to exchange them and everything was level - no oil pan removal required! I then drilled two (new) holes through the truck's cross member, put in longer frame-mounting bolts and added some extra rubber padding (cut from a truck mud-flap) to keep the mount from rubbing on the frame and so far its worked ok.
     
  3. vwnate1

    vwnate1 Member

    Joined:
    Jan 1, 2000
    Messages:
    11,643
    Location:
    AMERICA !
    Truck porn !

    Is what these photos are to me :D .

    I'd love to get my hands on it and bring it back to life , clean it HOSPITAL clean then re paint it GMC RED with glossy black accessories , you even have the DELCO tags ! SWEET :p .

    I spent to - day tearing into three old engines for my '69 C/10 , I love engine works .

    -Nate

     
  4. RidesWithYah

    RidesWithYah Member

    Joined:
    Jan 10, 2011
    Messages:
    309
    Location:
    Lexington KY
    Weighing options for the frame...

    What's the better choice for the frame of a driver, powder coat or black epoxy primer, and why?
     
  5. RidesWithYah

    RidesWithYah Member

    Joined:
    Jan 10, 2011
    Messages:
    309
    Location:
    Lexington KY
    It's Thanksgiving

    This year I'm thankful for pride in ownership and people who are religious about preventive maintenance.
    Based on what I'm seeing here, I'm optimistic this won't need to be rebuilt before running it -- maybe just a cam and lifters, while I've got it out...

    If you EVER have the opportunity to buy an engine that belonged to your local volunteer fire department, DO IT.
     

    Attached Files:

  6. 50 Chevy LS3

    50 Chevy LS3 Member

    Joined:
    Jan 14, 2013
    Messages:
    951
    Location:
    Indiana
    My opinion on frame finishing, for what it's worth.
    I will paint the frame of my truck, using a good quality epoxy primer for corrosion resistance followed by probably polyurethane enamel. The "hard" enamel tends to chip with rocks, but my truck will not be a "daily driver", just weekend play toy. My work semi-truck frame is painted with polyurethane "Imron" and chips, but is very corrosion resistant and is re-painted about every five years.
    Powder coating is encouraged by the greenies and the government as it is environmentally friendly, but, I hate it. The reason is, it looks good when applied new, fades very little if at all, very easily applied by relatively untrained workers, and for those reasons is popular with manufacturers. (no v.o.c.s to cause the globe to warm up) The bad news is, if you skip any stage in the application, missed sand blast, phos. acid rinse, etc, it WILL allow corrosion to start undetected underneath. The corrosion spreads until you blow-off a huge portion of it and then what?
    Paint can be spot repaired and epoxy-primer battles corrosion very well.
    Just my opinion...
     
  7. RidesWithYah

    RidesWithYah Member

    Joined:
    Jan 10, 2011
    Messages:
    309
    Location:
    Lexington KY
    Think the cleanliness under the valve cover is due to more than obsessive PM. Found this tag (first pic) hiding above the starter.
    My 270 is apparently now a 278!

    Anybody familiar with Rogers?

    Also including a pic of the engine serial number.

    And, thought this was interesting -
    where the Chevy just has a breather tube, the GMC has an oil fill, and a small oil bath air cleaner. There is no oil fill on the valve cover. Instead, a line connected to manifold vacuum. Looks like the motor draws fresh air in through the oil fill and out through the valve cover, reverse from the Chevy. Any reason not to keep this setup?
     

    Attached Files:

  8. vwnate1

    vwnate1 Member

    Joined:
    Jan 1, 2000
    Messages:
    11,643
    Location:
    AMERICA !
    Frame And Engine

    As Steve mentioned , powder coating is a bad choice for anything you plan to use ~ by the time you realize you have a rust problem , it's usually too late to do anything but scrap the frame , assuming it doesn't break when you're driving it , all nice and shiny .

    Enamel isn't too hard , it'll flex and withstand much road abuse , stones and gravel etc. , it's easy to clean and spot repair any damage .

    Epoxy based paints seem to work well on frames .

    The engine appears to be good , take your time in re awakening it , use thin Dino based oil and change it as soon as it gets black or begins to stink , a few 50 ~ 100 mile hot oil changes and you'll know if it's going to be O.K. or need an overhaul .

    I'd say you have a good one there , can't wait to see it all cleaned up and re painted , set in and running , I expect video with SOUND .
     
  9. Bill Hanlon

    Bill Hanlon Member

    Joined:
    Jun 4, 2002
    Messages:
    2,723
    Location:
    Fredericksburg TX
    That sounds like the GMC optional PCV system.
     
  10. RidesWithYah

    RidesWithYah Member

    Joined:
    Jan 10, 2011
    Messages:
    309
    Location:
    Lexington KY
    Spark Plugs

    Not a lot of progress to show this winter, still gathering parts and making plans. Thought I'd share what I learned about spark plugs.

    The AC 45 is still available, but many sources suggest using something "one step colder" in a heavy duty (truck or performance) application. Lower AC numbers are "colder" plugs, but the 44 is getting hard to come by. I know some folks run 43, but I've also heard that can be too cold, leading to fouled plugs.

    Two suffixes of interest in the AC numbering scheme -- they use an "S" suffix for their version of the extended tip plugs. These were introduced in the late 50s. And for a time (beginning in the 1970s) they used an "X" for plugs pre-gapped to about 0.060", for use with HEI. Nate frequently preaches the value of wider gaps...

    I found AC R44SX on "Wholesale Closeout" at RockAuto for $.80 each. This is the plug recommended by Tom Langdon with his mini-HEI kits. I don't know if they're fixing to obsolete them, or just that one dealer was clearing them out. Maybe there just isn't the demand for mid-70s Buick plugs that there used to be. Regardless, I put a few sets on the shelf, so I've got some for next time, too.

    Plug on the bottom is an R43. The one on top is an R44SX.
     

    Attached Files:

    Last edited: Mar 24, 2015
  11. vwnate1

    vwnate1 Member

    Joined:
    Jan 1, 2000
    Messages:
    11,643
    Location:
    AMERICA !
    Spark Plug Trivia

    THANK YOU for that ! .

    This is good basic info that very few bother with anymore , I guess new technology makes spark plug heat ranges somewhat redundant .

    FWIW ~ the center electrode sticking out like that helps make the plug foul resistant .

    Colder plugs were for Commercial use , lots of idling and low RPM use caused these old tech engines to foul up the electrodes leading to mis firing .

    I never use hotter plugs , I just maintain the ignition system sharply and , as mentioned , I use the widest gaps I can as this drives the ignition system to it's maximum out put , giving you improved performance and more power , blah blah blah yakkity woof blah .

    Any sort of breakerless ignition up grade (I like/use/highly recommend Pertronix' Ignitor) is a true " free lunch " as it makes any engine run better , start easier etc. , etc.

    On HEI systems (I love these) you can run really wild gaps ~ the oil drinking 250 C.I.D. engine in my '69 C/10 uses a quart of oil every 150 miles and fouls the spark plugs beyond cleaning ability in 200 miles , what to do ? .

    I'm lazy so instead of replacing the rings I got an original Generous Motors Junk Yard HEI dizzy and installed it , opened those gaps up to .072" and guess what ? it still burns the oil but almost ZERO smoke and it runs like a raped ape to boot .

    In 1975 when HEI was introduced m they suggested .065" spark plug gaps , mostly for emissions reasons but it really woke up those de tuned malise - era engines a lot .

    The down side is : the increased spark energy also wears out the caps and rotors faster so now a days they suggest .045" spark plug gaps .

    I agree .

    With points , you should begin @ .035" , that's the minimum .
     
  12. 52wasp

    52wasp Member

    Joined:
    Jul 21, 2006
    Messages:
    672
    Location:
    Wilton, New Hampshire
    frame paint...

    Sometimes, simple(r) is better.

    Rustoleum, 777 (satin black).

    The stuff works like its supposed to, is inexpensive, and I can tell you it has graced the frames of some HIGH dollar resto's...

    you can thin it and spray it, or brush it.

    it works, and it will be what I use.
     
  13. vwnate1

    vwnate1 Member

    Joined:
    Jan 1, 2000
    Messages:
    11,643
    Location:
    AMERICA !
    Pedant Comment

    If it's satin it's NOT RESTORED .

    FWIW , I agree , Rustoleum is good stuff .
     
  14. RidesWithYah

    RidesWithYah Member

    Joined:
    Jan 10, 2011
    Messages:
    309
    Location:
    Lexington KY
    Shocking...

    For 1/2 Ton AD rears, Rock Auto lists Monroe 33049 or Gabriel 82066. The Monroe extends from 12 5/8" to 21 1/4"; the Gabriel is similar from 13.3" to 22.7". Both have a 5/8" ID rubber bushing on the lower mount, and stem mount top.

    For my wife's 2000 Sienna, they list a KYB Gas-A-Just KG5522; 13.0 - 21.3". Also with a 5/8" ID rubber bushing on the lower mount and stem mount top.

    By the stats, it looks like a perfect match. Anybody try this?
    KYB is also running a $40 rebate if you buy any 4 shocks or struts, so I just may go this route. (The wife's van needs a pair, too...)

    For the fronts, a little digging uncovered KG4503. It extends from 9.5 to 14.5", and has stem mounts on both ends. (For comparison, Monroe 5826 is 10 1/8 - 16 3/8"; and Gabriel 81270 is 10.6 - 17.7") Is my thinking right, that the slighly shorter KYB may actually be a little better suited to a dropped front end, whether by drop axle or removed leafs?

    If you like to use Rock Auto, feel free to use my discount code. It's only 5%, but is good until June 7. Just put 3018598127682922 in the "how did you hear about us" box. I don't get anything for it, but am allowed to share.
     
    Last edited: Apr 8, 2015
  15. RidesWithYah

    RidesWithYah Member

    Joined:
    Jan 10, 2011
    Messages:
    309
    Location:
    Lexington KY
    Yes, I know disassembly leads to madness...

    Been getting things torn down.
    Found out why my truck was always so rattly-squeaky...
    The bed wasn't bolted to the frame, unless you count the bottom of the rear fenders being bolted to the running boards.

    Gonna go look for pics of what the mounts are supposed to look like.

    Also getting the extra front axle I picked up stripped to send to Sid for a 3" drop and 1" narrow.

    Next will be getting the cab off. Plan to take the frame out to be sandblasted before beginning reassembly.

    Happy spring, y'all.
     

    Attached Files:

  16. vwnate1

    vwnate1 Member

    Joined:
    Jan 1, 2000
    Messages:
    11,643
    Location:
    AMERICA !
    Don't feel badly ~

    I found the same thing a year or so after I'd purchased and worked my old '49 3100 .......

    There were NO bed blocks .

    A very kind and helpful person here mailed me a set and I bought some long bolts , properly bolted the bed down and rattled off into the sunset .
     
  17. 50 Chevy LS3

    50 Chevy LS3 Member

    Joined:
    Jan 14, 2013
    Messages:
    951
    Location:
    Indiana
    Bed blocks...

    I'm curious, do you guys know the dimensions of the original hardwood bed blocks?
    I think a half ton used four?
     
  18. vwnate1

    vwnate1 Member

    Joined:
    Jan 1, 2000
    Messages:
    11,643
    Location:
    AMERICA !
    Bed Block Dimensions

    If you go back 15 + years I had a post about this , I remember someone posted this info up .

    It's important to have the grain running up and down else they'll split in short order .

    A *very* kind Trucker here , made me a set in his home wood shop , I have no wood working tools nor skills .
     
  19. RidesWithYah

    RidesWithYah Member

    Joined:
    Jan 10, 2011
    Messages:
    309
    Location:
    Lexington KY
    Last edited: Apr 29, 2015
  20. 50 Chevy LS3

    50 Chevy LS3 Member

    Joined:
    Jan 14, 2013
    Messages:
    951
    Location:
    Indiana
    Thanks, Rides, the answer to my question was as close as our host's online catalog.
     

Share This Page