Only way is up!

Discussion in '1947-1954' started by Zig, Jul 12, 2008.

  1. Zig

    Zig Member

    Joined:
    Oct 14, 2006
    Messages:
    4,860
    Location:
    Pittsburg KS
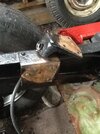
    The pump looks sooo pretty...

    From what I remember reading, before I go and install it, I guess it would be wise to be some of that blue gasket sealant, just to be sure?

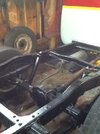
    So the closer I get to getting my truck wheels to turn, the more I'm going over the what else to do list. With that new rear end in there, I remember my buddy welding the perches on and seeing smoke rise from the vent tube on the axle.
    I'm thinking, that oil probably got a lot hotter than it ever should have, (under normal driving conditions) so it probably ought to be changed out.
    So I need some advice. Do I just remove the bottom bolt, drain the fluid and refill it, or do I take the cover off the differential and replace the gasket while I'm at it? (Just in case the heat got to the gasket as well and maybe took away some of it's longevity.)
    Thanks!
     
  2. Zig

    Zig Member

    Joined:
    Oct 14, 2006
    Messages:
    4,860
    Location:
    Pittsburg KS
    Tying up the loose ends~

    Old drive shaft hooked to new rear end. W-A-Y to much time and effort to ever think of doing this for a living! :(
    Tomorrow, brake line work.
    Might take my old wheels and tires to Wally to have them remove everything so I can grind down my original wheels and paint them up.
    I'll wait on some snazzier wheels until after I get this thing rolling.
    Pulling the steering wheel tomorrow to line it up like it should be.
    Happy! Time to fire up the grill and have me an adult beverage. :D
     
  3. vwnate1

    vwnate1 Member

    Joined:
    Jan 1, 2000
    Messages:
    11,643
    Location:
    AMERICA !
    Water Pump Install

    I don't think any tube typ sealants are good on water pump gaskets because I'm always finding (and having the devil of a time getting out :mad:) globs or little balls of RTV Sealants in the radiator , coolant passages , oil intake screens and once in a blue moon , the oil passages in the crankshaft :eek: .

    Wire bush both sides hospital clean and if you're still worried , use your finger tips to smear a super thin coat of sealant on both sides of the gasket before re assembling .

    I assume you already ran an clean and oiled 3/8" USS tap into all the bolt holes and ascertained wich bolt it is that goes into the water jacket so you can coat that one with white lithium grease , plus laboriously hand wire brushed all the bolts threads ? .

    Now you see why Auto mechanics are paid so highly .

    Oh wait , no , we're not :mad: .

    :rolleyes: .

    Carry on then ! ;) .
     
  4. Bill Hanlon

    Bill Hanlon Member

    Joined:
    Jun 4, 2002
    Messages:
    2,721
    Location:
    Fredericksburg TX
    #2 Permatex worked well on mine Zig.
     
  5. Zig

    Zig Member

    Joined:
    Oct 14, 2006
    Messages:
    4,860
    Location:
    Pittsburg KS
    Thanks for the tips as always!
    My baby is setting on it's new shoes tonight and it looks so friggin tough! :D
    When the sun comes out when I am at home, I'll open the door and get some photos.
    The 2" dropped springs give it a killer (IMO) stance!
    So happy right now.
     
  6. Zig

    Zig Member

    Joined:
    Oct 14, 2006
    Messages:
    4,860
    Location:
    Pittsburg KS
    Proud papa with photos~

    Evan, you have no idea how happy I would be if you can stop by on your way North! ;)
     

    Attached Files:

  7. Zig

    Zig Member

    Joined:
    Oct 14, 2006
    Messages:
    4,860
    Location:
    Pittsburg KS
    BTW, the paint on this thing is just how it came out of the gun. Yes there are some runs, but I hear they can be buffed out.
    Please don't let your truck rust away. (Or do) That will make mine even more valuable. :)
     
  8. Kens 50 PU

    Kens 50 PU Member

    Joined:
    Jun 8, 2006
    Messages:
    3,403
    Location:
    tomball, tx
    Looking good Ziggy!

    Where's the "Like" button! One step closer! Keep it up and post more pics!

    Ken:cool:
     
  9. Thunder54

    Thunder54 Member

    Joined:
    Jan 1, 2000
    Messages:
    358
    Location:
    Port Arthur, TX
    Nice work Zig

    How many years has been Zig? The Kansas City Special is just about to jump out of hiding!

    I can hardly wait for you to drive to Texas and let me see her.

    A real lesson in never giving up. I am really happy for you. I still can't help but grin like a jackass eating briars every time I get behind the wheel of my truck. You will fully understand this feeling soon.

    Take lots of photos.
    Jim
     
  10. Bill Hanlon

    Bill Hanlon Member

    Joined:
    Jun 4, 2002
    Messages:
    2,721
    Location:
    Fredericksburg TX
    I heard a rumor that Clark Hunt is moving the Chiefs to LA soon Zig. You better get a move on.:D
     
  11. ccharr

    ccharr Member

    Joined:
    Jun 7, 2006
    Messages:
    2,175
    Location:
    Simi Valley, Ca. , La Paz County, Az.
    The Truck is looking really good Paul. Thanks for posting the photos.
     
  12. Kens 50 PU

    Kens 50 PU Member

    Joined:
    Jun 8, 2006
    Messages:
    3,403
    Location:
    tomball, tx
    No problem Bill. If the Chiefs move to La La land, Zig can replace the red paint with blue, leave the white as is, and repaint the yellow stripe gold. It will be the new Royals tailgater!:D

    zig paint scheme.jpg

    tailgate.jpg

    How cool would the tailgate look painted like picture 2?
     
  13. 52wasp

    52wasp Member

    Joined:
    Jul 21, 2006
    Messages:
    672
    Location:
    Wilton, New Hampshire
    the "Kansas City Special"

    Hey Zig, while you weren't looking, Thunder54 named your truck!

    and the KC Special is looking QUITE NICE!

    keep it up, and YOU will be doing a "victory tour" of your own!
     
  14. Zig

    Zig Member

    Joined:
    Oct 14, 2006
    Messages:
    4,860
    Location:
    Pittsburg KS
    I love it! Hold the phone on the CHIEFS going anywhere, however! They are stuck here just as solid as I am!
    I really can't believe that after all these years I am getting this close to rolling along in it! I hope I can get the brakes done tomorrow, but I think it may not be until next weekend since I have to cut the grass for the first time this year as well. If not, then next weekend for sure!
    After that comes the reawakening of that 228! Once that happens, look out! :D
     
  15. Wolf

    Wolf Member

    Joined:
    Apr 20, 2008
    Messages:
    888
    Location:
    Kansas
    Oh wow Paul this is just awesome! Keep up the great work. I will keep my ears open listening for that 228 to fire up!!!
     
  16. Zig

    Zig Member

    Joined:
    Oct 14, 2006
    Messages:
    4,860
    Location:
    Pittsburg KS
    More crap to curl your toes~

    Not that I couldn't paint this, but I had an artist buddy donate a gift certificate to our school for a carnival we had, so I though, what the heck~ why not see if he'd paint my horn button in a CHIEFS kinda way.

    It will do.

    When I get around to trying my hand at pin striping, I may redo it. But until then, I like it.
     

    Attached Files:

  17. Bill Hanlon

    Bill Hanlon Member

    Joined:
    Jun 4, 2002
    Messages:
    2,721
    Location:
    Fredericksburg TX
    I like it Paul.
     
  18. vwnate1

    vwnate1 Member

    Joined:
    Jan 1, 2000
    Messages:
    11,643
    Location:
    AMERICA !
    Custom Touches

    I like it too Paul .

    It's the little things in life that make it enjoyable .
     
  19. Bilbo

    Bilbo Member

    Joined:
    Jul 4, 2007
    Messages:
    682
    Location:
    Magnolia, Texas
    Hey, That's pretty cool, Paul! Unique, too!
     
  20. Zig

    Zig Member

    Joined:
    Oct 14, 2006
    Messages:
    4,860
    Location:
    Pittsburg KS
    Shocking news!!!

    Or not~
    Anyway, I went to my local parts store with my old rear shock. The counter help went off memory ('cause the book was no help) and came up with a Gabriel shock that appeared to be a solid match.
    So I took it home and found out problem #1, the ferrule through the rubber bushing was wider then the saddle it was to fit in. By just a bit. So, I ground it down to where it fit. Now it was time to cut the restraint and see it fully extend into the shock tower.
    Problem #2. It missed by about an inch to fit like it was supposed to.
    Solution? Grind off three rivets in each tower, grind off the rust behind each surface, position and drill holes for bolts in lowered position, paint, dry time, bolt with grade 8 bolts, install shocks, have drink.
    I really love my grinder...
     

    Attached Files:

    Last edited: May 26, 2015

Share This Page