ol' chebby
Member
- Joined
- Dec 11, 2007
- Messages
- 3,167
- Reaction score
- 27
- Location
- Charlotte,NC
- Website
- www.rpettycustommurals.com
Step one, lay on your back and reach under dash to remove the 4- 3/8" nuts from the 4 corners of the guage.....be shure to disconnect the battery, as if you touch both poles of the ampmeter, your ratchet becomes a nifty arc welder.

Carefully wiggle the guage down through the wiring harness NOT bending either metal line! You can see 2 of the corner mounts here. That is the ampmeter right above my thumb.
Carefully pry out the 3 or 4 crimps around the edge of the bezel. I use a small flathead screwdriver.

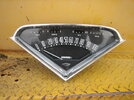
Remove bezel, glass and guage panel to reveal nekkid guages...

Remove the oil line compression fitting from back of guage.
Remove 2 small screws from the back of the offending guage, and the screws or the poles from the 2 surrounding guages to make it easier to remove. Every other guage has ears that reach behind the ones next door. Replace just the opposite of how it came out. When attaching the pressure line DO NOT tighten without a wrench on the square base of the guage....they do not like that and will make a nice puddle of oil in your guage cluster, as I found out on a previous build.

Clean the glass lens and put it in the chrome bezel along with the gauge seperator. Slip all over the front of gauge, line up the tab with the gap on the gauge body. Hold tightly together and crimp the lip back over gauge back with pliers in 4 places ( I use the places we had to remove to dissasemble.)
Now begin swearing as you fit it back under the dash, around the offending wires, onto the studs, and get the nuts started....you know, the ones which like to lodge themselves in your ear canal or eyeball after you drop them the 3rd time. Tighten up and enjoy your new oil pressure guage.

Carefully wiggle the guage down through the wiring harness NOT bending either metal line! You can see 2 of the corner mounts here. That is the ampmeter right above my thumb.
Carefully pry out the 3 or 4 crimps around the edge of the bezel. I use a small flathead screwdriver.
Remove bezel, glass and guage panel to reveal nekkid guages...
Remove the oil line compression fitting from back of guage.
Remove 2 small screws from the back of the offending guage, and the screws or the poles from the 2 surrounding guages to make it easier to remove. Every other guage has ears that reach behind the ones next door. Replace just the opposite of how it came out. When attaching the pressure line DO NOT tighten without a wrench on the square base of the guage....they do not like that and will make a nice puddle of oil in your guage cluster, as I found out on a previous build.
Clean the glass lens and put it in the chrome bezel along with the gauge seperator. Slip all over the front of gauge, line up the tab with the gap on the gauge body. Hold tightly together and crimp the lip back over gauge back with pliers in 4 places ( I use the places we had to remove to dissasemble.)
Now begin swearing as you fit it back under the dash, around the offending wires, onto the studs, and get the nuts started....you know, the ones which like to lodge themselves in your ear canal or eyeball after you drop them the 3rd time. Tighten up and enjoy your new oil pressure guage.
Last edited:

")
 The odometer numbers are already trying to come off. I'm going to stick em down with some finger nail polish.
