• We have upgraded our forum software! See here for details.

Some Items I did to my 59 Apache

steve

Member
Joined
Jan 1, 2000
Messages
321
Reaction score
4
Age
66
Location
Virginia
Well everyone, I'm not a pro, but the pictures will show some items/ mods I have done to me Apache 59, well it used to be a 59, it had the 59 small window cab, which was switch for a more solid big window from a 55, the big windows kind of grow on ya!. The front fenders are from a 58 GMC (you might have seen them on E-bay). The engine is a 1972 350 truck engine, with a 1987 200r4 overdrive transmission, I did not go with the 700R4 because the 200 is lighter shorter and will support the 300 hp. The bed is from a 1957, but that’s my original tailgate. You can see the power steering setup, (sorry Toyota 4x4 box). Three point seat belts, and this summer front 6 lug rotors and disc brakes.
 

Attachments

  • new truck 016.jpg
    new truck 016.jpg
    110.3 KB · Views: 539
  • new truck 019.jpg
    new truck 019.jpg
    98.5 KB · Views: 560
  • new truck 017.jpg
    new truck 017.jpg
    155.5 KB · Views: 564
  • new truck 022.jpg
    new truck 022.jpg
    135.8 KB · Views: 595
  • new truck 024.jpg
    new truck 024.jpg
    139.7 KB · Views: 580
Last edited:
Were there any fender fitment issues when you went to the 55 cab? Did the 59 fenders fit the cab and do both cabs use the same mounting points?

I really like the big back window, and there are some 59 cabs available, but I suspect I could get a better deal if I could look for a wider range of options.

Thanks!
 
Cabs

Hey babailey,

The fenders fit very well (same mounting points) no major mounting issue, one of the top fender support flange needed to be trimmed a ¼ inch, I don’t think it was with the cabs being different years but with a consistency with different fabrication plants or whatever back then. Even the fender brace used in the same location,

I think if there were any changes to the 55-57 and the 58-59 cabs it was very minor, maybe at the floor starter switch. I was a little confused with what hood hinges to use since I believe the earlier cabs were fire wall mounted only. But I used my 59.
Just to let you know ten years ago, I had the cab shipped from Southern California to Virginia for $600.00. The original purchase price of the cab was only $500.00. Right now I think I would like a fleet side pickup bed.
 
Thanks for the pics Steve. Can you tell us about the pwr steering build?
J
 
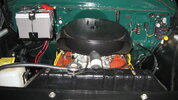
CCP Powersteering unit

The setup is I think the cleanest mod you can do for powering keeping the straight axle for our apaches. I did not want to remove the straight axle, did not want to wield a new complete front clip, ( I have driven trucks with this mod and they are more of a smooth ride, (car like)), however driving the straight axel with PS is a great feeling, I also maintain my original ride high. My intentions are to keep my truck looking as stock as possible with the driver comforts and dependability. That will help me drive it daily.

If you need the kit number I can provide, the CPP support staff 
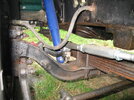
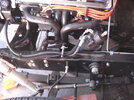
http://www.classicperform.com/6092chevtrk.htm was not so helpful, the kit came complete but mine came with a template different from the direction and was incorrect. Drilling the four holes need to be a one shot deal. I discarded the template and followed the directions. I think the original existing large hole may work and this will save of drilling one next to the existing as the directions indecated. I followed the direction and drilled where indicated.

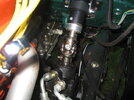
Keeping the stock look I tried to maintain me steering column and needed to be shorted, CPP provides a column saver kit for this. However the website incorrectly indicated how to measure, when called CPP they tried to bull shit in order to save the return shipping cost. The gist OD and ID they were incorrect on which one to used. This lost my respect for them. They actually tried to say “well some of our staff stated it will work and the other half of our staff said it would not”
However totally satisfied, they said they would not charge me and they did anyway(refuned my shipping another call).

Sad to say it is a Toyota 4x4 steering box, not GM, but nowadays what auto parts are actually made in the US.

Good luck.
 

Attachments

  • new truck 002.jpg
    new truck 002.jpg
    107.2 KB · Views: 536
  • steering 002.jpg
    steering 002.jpg
    171.4 KB · Views: 574
  • steering 003.jpg
    steering 003.jpg
    74.3 KB · Views: 554
  • steering 004.jpg
    steering 004.jpg
    108.3 KB · Views: 530
  • steering 001.jpg
    steering 001.jpg
    120.6 KB · Views: 561
Steve
Nice work. Your bed looks awesome.
I am thinking of doing the p/s mod myself with the toyota box too.

Stand by for lots of questions in the future.:D

You mentioned front disks...

Whats your plan? I am thinking about this too but wasnt sure if I should use the kit or look for a donor vehicle....
 
Bed Wood

LDO.

Thanks for the kind comments, believe me; I had a hard time not painting the bed wood black like when they came from the factory. Or was thinking of using those composite decking boards. But pine is cheap and made in the U.S.

Also with the steering mod, the existing emergency brake will needed to be modified, I used a cable that replaced all of the hard steel hardware, but still maintained my under dash hand liver. The cable is from a 2500 dodge diesel.
 
Last edited:
Steve,
that's interesting on the ebrake cable. Can you provide more info (via PM if you like).

Also, what's your plan for the disk rotors?

I am interested in putting disks front/rear and i've seen a kit for the front using your existing hubs but is there a way to replace all that with newer stuff?
 
No pm's !

This is far to important not to share with the entire forum .

Your truck is very nice and I like the work you've done .

Keep it up .
 
Nate,
no worries I agree, however, I didn't know if Steve wanted to jack his own thread or not.:D
 
It may be a toyota gear box .You will be happy with it.I'm very happy with mine.Your project looks good,keep it up.
Bobby
 
Steering

Bobby,

I seen your post, did you used the originial 2 inch hole where the steering was located? Instead of drilling a new one for the poweering steering install.
 
Hey Nate

Thanks for the comments, I know you’re a traditionalist, liking stock but around the Northern Virginia area they drive like hell, got to keep up with the flow. So my mods will help me do just that. I read your post just so I can grasp some knowledge that you share.

Steve.
 
Thanks for sharing Steve, At least I know what I'm getting myself into when I do the install.
J
 
Emergency Brake Modification

When installing the Toyota steering box the Emergency Brake (EB) components were going to be in the way. I wanted to keep the inside of the cab original and not adding a floor mounted EB level, (yes the floor shifter is not original but will be replaced with all the original column shifting linkage in the future).

The long rod attached to the under dash lever was shortened to about six inched, rethreaded and the end piece (U bolt) reinstalled. The dodge cable reached from the EB collector under the bed where a bracket was fabricated to support the end of the EB cable and support the return spring.

The EB cable was Routed out of the way (no pinch points) under the up through the firewall, entering in the same location the 30 inch steel rod was original located. The cable end fit the existing hole perfect, however to add additional support to the floorboard a aluminum bracket was fabricated.

The install is functional, simple and to some extent clean. I will put a proper size pin in to replace the wire key lock.

Oh yes my electrical wiring neatness a low c-. that under dash work is hard on the old body.
 

Attachments

  • ebrake 003.jpg
    ebrake 003.jpg
    150.3 KB · Views: 461
  • ebrake 006.jpg
    ebrake 006.jpg
    106.4 KB · Views: 457
  • new truck 001.jpg
    new truck 001.jpg
    96 KB · Views: 487
  • ebrake 004.jpg
    ebrake 004.jpg
    146.4 KB · Views: 467
This is the best pict of mine that i have I left my bracket in the original location and there was enough clearance for the cable to back along the frame rail.Only modifacation i had to make was move the pivot roller to clear the brake booster.I put mine together frame off so it did make the install a little easier.
Bobby
 

Attachments

  • CIMG2096.jpg
    CIMG2096.jpg
    118.7 KB · Views: 441
I just found these two.one shows the pivot and the other shows the cable running doewn the frame rail
Bobby
 

Attachments

  • CIMG2348.jpg
    CIMG2348.jpg
    64.5 KB · Views: 460
  • CIMG2350.jpg
    CIMG2350.jpg
    58.2 KB · Views: 435
Bobby

Did you used the exinting large hole for the poweering? Od did you drill one 1.5 inched closer to the fire wall.?? Yours looks a lot neater then mine. Looks like you also have your new master cylinder installde for the dis brakes?
 
Last edited:
Back
Top