• We have upgraded our forum software! See here for details.

Only way is up!

Depends~

Yeah, but can you get your stuff OUT through the doorway??

The truck's going no where soon, but the boat can still go in and out. Not that it has, however... :(
I at least have all the parts hung on the walls and everything else moved to the side.
 
Only one problem...

This is a VERY cool way to build a garage. Put your stuff in there, build around it and you KNOW it will fit. :D

Lifting those 20 foot long 2X10's (over my truck) that made up the roof was not the most fun I've ever had. I could have asked for help, but that would have taken the risk out of the whole deal. :D
 
Post #29 has how the foot starter linkage is hooked to the bell housing. Hope this helps.
 
A million square inches await

That's what it seems like when it comes to removing the old to make ready for new. Finally got started on the hood. These darn holidays and camping/fishing really slow me up! :rolleyes:
 

Attachments

  • DSCF0232.jpg
    DSCF0232.jpg
    87.9 KB · Views: 469
Time for a friggin frackin update!

So it's been real hot lately~ summer... However, I get to mark something off my "to do" list! The million inches have been conquered! YAY!

So of course, I have some pictures for you! (Then I gotta give my daughter's camera back to her.) :rolleyes:

I just had to remove the GMC emblems from the sides of the hood. I didn't want to work around them when washing the truck. (Plus, they wouldn't work with my paint scheme that I'm a gonna do.)

The picture with the black lines on the side of the hood show the path of the yellow line that will separate the red and the white areas. Should look pretty cool, me thinks. (And yes, there could be a KC arrowhead at the end of the curve closest to the front of the truck...)

Now time for an adult beverage of my choice! :D
 

Attachments

  • DSCF0001.jpg
    DSCF0001.jpg
    121.2 KB · Views: 491
  • DSCF0002.jpg
    DSCF0002.jpg
    64.5 KB · Views: 487
  • DSCF0009.jpg
    DSCF0009.jpg
    110 KB · Views: 519
  • DSCF0012.jpg
    DSCF0012.jpg
    124.9 KB · Views: 483
  • DSCF0011.jpg
    DSCF0011.jpg
    84.4 KB · Views: 500
  • DSCF0016.jpg
    DSCF0016.jpg
    107.7 KB · Views: 513
  • DSCF0018.jpg
    DSCF0018.jpg
    81.3 KB · Views: 489
  • DSCF0019.jpg
    DSCF0019.jpg
    65.6 KB · Views: 485
  • DSCF0014.jpg
    DSCF0014.jpg
    112.1 KB · Views: 468
Last edited:
In case you missed it~

Here is what the truck is supposed to look like, minus the white line above the yellow on the hood. That is the Chevy emblem that was glued on the model. I should have shaved that! Anyway~
I might go with bed liner covered running boards and might tweak a thing or two as well, but overall, this will be the look.
 

Attachments

  • IMG_0960.jpg
    IMG_0960.jpg
    68.7 KB · Views: 463
Paul,

That's an awesome paint scheme! To me, it looks like two different shades of red there... a darker, deeper red for the top of the cab and rear of the hood... with a brighter red for the front of the hood, grille, fenders, etc. Is that correct? And I think I see a kind of reversed scallop thing going on with the deeper red transitioning into the bright red... like the bottom of the Batman symbol... cool stuff!

Can't wait to see it on the 1:1 truck... get on it, buddy!!

Damon
 
Oh Yeah!

I'm liking what I see bro! Now, for the benefit of the newbies, find the thread that shows the cab that you painted (I looked but couldn't find it!) and re-post it so everyone can visualize what you've got in mind for the paint scheme!

Ken:cool:
 
Thanks, Damon!

Paul,

That's an awesome paint scheme! To me, it looks like two different shades of red there... a darker, deeper red for the top of the cab and rear of the hood... with a brighter red for the front of the hood, grille, fenders, etc. Is that correct? And I think I see a kind of reversed scallop thing going on with the deeper red transitioning into the bright red... like the bottom of the Batman symbol... cool stuff!

Can't wait to see it on the 1:1 truck... get on it, buddy!!

Damon

Thanks, everyone!

You aren't supposed to notice the reverse scallops. I started off with all white on the bottom half and tried just the scallops. It looked okay, but~ Then I tried flipping the scallops on the fenders with red in the front going to white, but~ Then I ended up with this and knew I finally got the look I was going for.
You know I'll keep posting pictures! :D
 
"Shaved" emblems?

I've never shaved anything but my face, but I guess this is what they call Shaving as far as bodywork goes? Anyway, the emblems are gone and now I'll be able to do the paint scheme I want without the competition they would have provided. Also got the grill all down to bare metal and ready for RED! :D
 

Attachments

  • DSCF0039.jpg
    DSCF0039.jpg
    85.4 KB · Views: 439
  • DSCF0040.jpg
    DSCF0040.jpg
    67.4 KB · Views: 452
  • DSCF0041.jpg
    DSCF0041.jpg
    177.7 KB · Views: 484
  • DSCF0044.jpg
    DSCF0044.jpg
    188.6 KB · Views: 487
More Nudity~

Please keep your children away if you are viewing this!
Full frontal nudity!

Okay~ easy, easy. Just spent so much time in the heat and humidity I had to share. Piece by piece it gets closer and closer.
 

Attachments

  • DSCF0055.jpg
    DSCF0055.jpg
    200.4 KB · Views: 516
  • DSCF0056.jpg
    DSCF0056.jpg
    130 KB · Views: 511
My plug for the mighty 3M wheel!

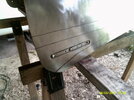
Its......NEKKID! The metal looks nice and clean...lucky you.

And a mountain of mind numbing patients... With an assortment of 3M wheels and wire brushes made for drills, it comes out looking pretty good. Then I hit it with primer and it's like the shiny thing never happened. :(

But soon it will be RED!!! :D
 
Nekkid As A Jay Bird !

I wish I had the physical ability to do this Zig ;

Nowadayze I have the patience but the thought of holding a power tool for that long makes me hurt much less the doing it .
 
Yes, there was something I would rather be doing!

But, it ain't gonna strip itself. I left the drill plugged in and setting right next to the running board, but when I checked in the morning, it was still setting by the running board. Damn~

I kinda have a big old hole in the one running board. It is from where the spare tire mounted that had been installed m-a-n-y moons ago. I think I will attach some of that diamond steel here, since I plan on putting the spare back in the same spot. Anyway, just the underside of the holy running board, then time to buy two back fenders and a GMC tailgate from Tom's Truck Parts! YAY!
 

Attachments

  • DSCF0057.jpg
    DSCF0057.jpg
    167.8 KB · Views: 480
  • DSCF0058.jpg
    DSCF0058.jpg
    148.1 KB · Views: 519
  • DSCF0059.jpg
    DSCF0059.jpg
    132.9 KB · Views: 493
Wire Wheeling

What RPM is your drill motor ? (it'll be marked) .

I've been hand wire brushing the old paint off the oil pan, still need to do the rocker box and side covers ~ whew that's hard work .

Both those running boards look pretty good .

Maybe you can make a spare wheel support in the hole ? .
 
Thanks, Nate. It's a labor of love, for sure.

The drill is just a 3/8, 2,500 RMP.
 
That's a vast improvement in speed ! .

Mine is a decades old Milwaukee , made in America no less but it was sold by Lawson who also sold high end drill bits , my guess is they didn't want folks over speeding and burning up drill bits , it certainly works well for drilling , not so much for de rusting .

BTW : Harbor Freight has packages of mixed wire wheels on sale right nor for $3.99 ~ you get 6 assorted wire wheels and brushes , a good deal even if it's Chinese crap .
 
Back
Top