mobileortho
Member
Looking good Zig!!
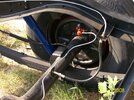
") If I remember right, You did the front disc conversion. I have since done the same. The pic that shows the master cylinder has a residual valve in the line to the front brakes, which I removed when I installed the Disc brakes. The dual MC is for a '70 Mustang with front disc and rear drum brakes, and as such, has built in residual valves for both brake types. I've driven mine since the brake conversion, and it seems to brake just fine. (Manual, not power brakes). The front line is run across the rear of the cross member to prevent the brake line from being damaged if you hit something in the road..
If I remember right, You did the front disc conversion. I have since done the same. The pic that shows the master cylinder has a residual valve in the line to the front brakes, which I removed when I installed the Disc brakes. The dual MC is for a '70 Mustang with front disc and rear drum brakes, and as such, has built in residual valves for both brake types. I've driven mine since the brake conversion, and it seems to brake just fine. (Manual, not power brakes). The front line is run across the rear of the cross member to prevent the brake line from being damaged if you hit something in the road.. I hope I haven't bored you with stuff you already know, but I'd rather tell something you know than skip something you need to know.
Looking very good there ! .
I really like the firewall treatment .

Looking good, Zig. Now, put it together already.
Andy

I'm kinda happy about how smooth the paint turned out. Not buffed, wet sanded, anything. Again, HVLP spray gun worked great! (for only a second attempt...)")
I have a workday today, so I was able to get some stuff done this weekend. I need to order the welting so this weekend I can get the fenders mounted.
Thanks again, Russ. Your How To thread really helps with the visuals!
 Your truck is looking really nice. Progress makes you want to do more, doesn't it? Keep up the good work.